Deploy an EKS cluster with Terraform
This guide explains how to provision an Amazon Web Services (AWS) Elastic Kubernetes Service (EKS) cluster using Terraform, a widely used Infrastructure as Code (IaC) tool.
The EKS cluster serves as the infrastructure foundation for running Camunda 8.
Camunda recommends this approach for a robust, sustainable setup. For a quicker trial or proof of concept, or if the Terraform module doesn’t meet your needs, see Deploy an EKS cluster with eksctl.
For advanced EKS scenarios, see the Amazon EKS documentation.
New to Terraform or Infrastructure as Code? Start with the Terraform IaC documentation and try the interactive quick start.
Requirements
- AWS account – Required to create AWS resources. See What is an AWS account?.
- AWS CLI – Command-line tool to manage AWS resources. Install AWS CLI.
- Terraform – IaC tool used to provision resources. Install Terraform.
- kubectl – CLI for interacting with Kubernetes clusters. Install kubectl.
- jq – Lightweight JSON processor. Download jq.
- IAM Roles for Service Accounts (IRSA) – Configure IRSA to map IAM roles to Kubernetes service accounts. This removes the need for long-lived credentials and lets Kubernetes services assume IAM roles to interact with AWS services (for example, S3, RDS, Route 53).
- See the AWS IRSA deep dive.
- IRSA is recommended as an EKS best practice.
- AWS service quotas – Verify your quotas before deployment:
- At least 3 Elastic IPs (one per availability zone).
- Adequate quotas for VPCs, EC2 instances, and storage.
- Request increases if needed via the AWS console. You pay only for used resources. See AWS service quotas and Amazon EC2 service quotas
- Shell – Examples use GNU Bash.
For the tool versions used in testing, see the repository’s .tool-versions file. It contains an up-to-date list of versions used for testing.
Considerations
General considerations
This setup provides a solid starting point for running Camunda 8 on AWS. It is not optimized for peak performance. Use it as a foundation you can extend and adapt for production with Infrastructure as Code (IaC) tools.
If Terraform feels complex at first, try the eksctl guide for a simpler entry point, which shows the resources created and how they interact with each other.
- To test or develop against Camunda 8, consider signing up for our SaaS offering.
- If you already have an Amazon EKS cluster, skip ahead to the Helm setup guide to deploy Camunda 8.
Security considerations
The following security considerations were flagged by Trivy to simplify adoption and development. Review and address these before production.
You can look up each ID in the Aqua vulnerability database.
AVD-AWS-0040 #(CRITICAL): Public cluster access is enabled.
AVD-AWS-0041 #(CRITICAL): Cluster allows access from a public CIDR: 0.0.0.0/0
AVD-AWS-0104 #(CRITICAL): Security group rule allows egress to multiple public internet addresses.

AVD-AWS-0343 #(MEDIUM): Cluster does not have Deletion Protection enabled
AVD-AWS-0178 #(MEDIUM): VPC does not have VPC Flow Logs enabled.
AVD-AWS-0038 #(MEDIUM): Control plane scheduler logging is not enabled.
AVD-AWS-0077 #(MEDIUM): Cluster instance has very low backup retention period.

AVD-AWS-0133 #(LOW): Instance does not have performance insights enabled.
Reference architectures and examples provided in this guide are not turnkey modules. Camunda recommends cloning the repository and modifying it locally.
You are responsible for operating and maintaining the infrastructure. Camunda updates the reference architecture over time and changes may not be backward compatible. You can use these updates to upgrade your customized codebase as needed.
This guide will incur costs on your cloud provider account, specifically for the managed Kubernetes service, running Kubernetes nodes in EC2, Elastic Block Storage (EBS), and Route 53. For more details, see AWS EKS pricing and the AWS Pricing Calculator. Costs vary by region.
Variants
We support two variants of this architecture:
-
Standard installation - Uses username and password connection for the Camunda components (or relies on network isolation for specific components). This option is straightforward and easier to implement, making it ideal for environments where simplicity and rapid deployment are priorities, or where network isolation provides sufficient security.
-
IRSA (IAM Roles for Service Accounts) - Uses service accounts to perform authentication with IAM policies. This approach offers stronger security and better integration with AWS services, as it eliminates the need to manage credentials manually. It is especially beneficial in environments with strict security requirements, where fine-grained access control and dynamic role-based access are essential.
How to choose
- If you prefer a simpler setup with basic authentication or network isolation, and your security needs are moderate, the standard installation is a suitable choice.
- If you require enhanced security, dynamic role-based access management, and want to leverage AWS’s identity services for fine-grained control, the IRSA variant is the better option.
Both can be set up with or without a Domain (Ingress).
Outcome
Infrastructure diagram for a single region EKS setup (click on the image to open the PDF version)
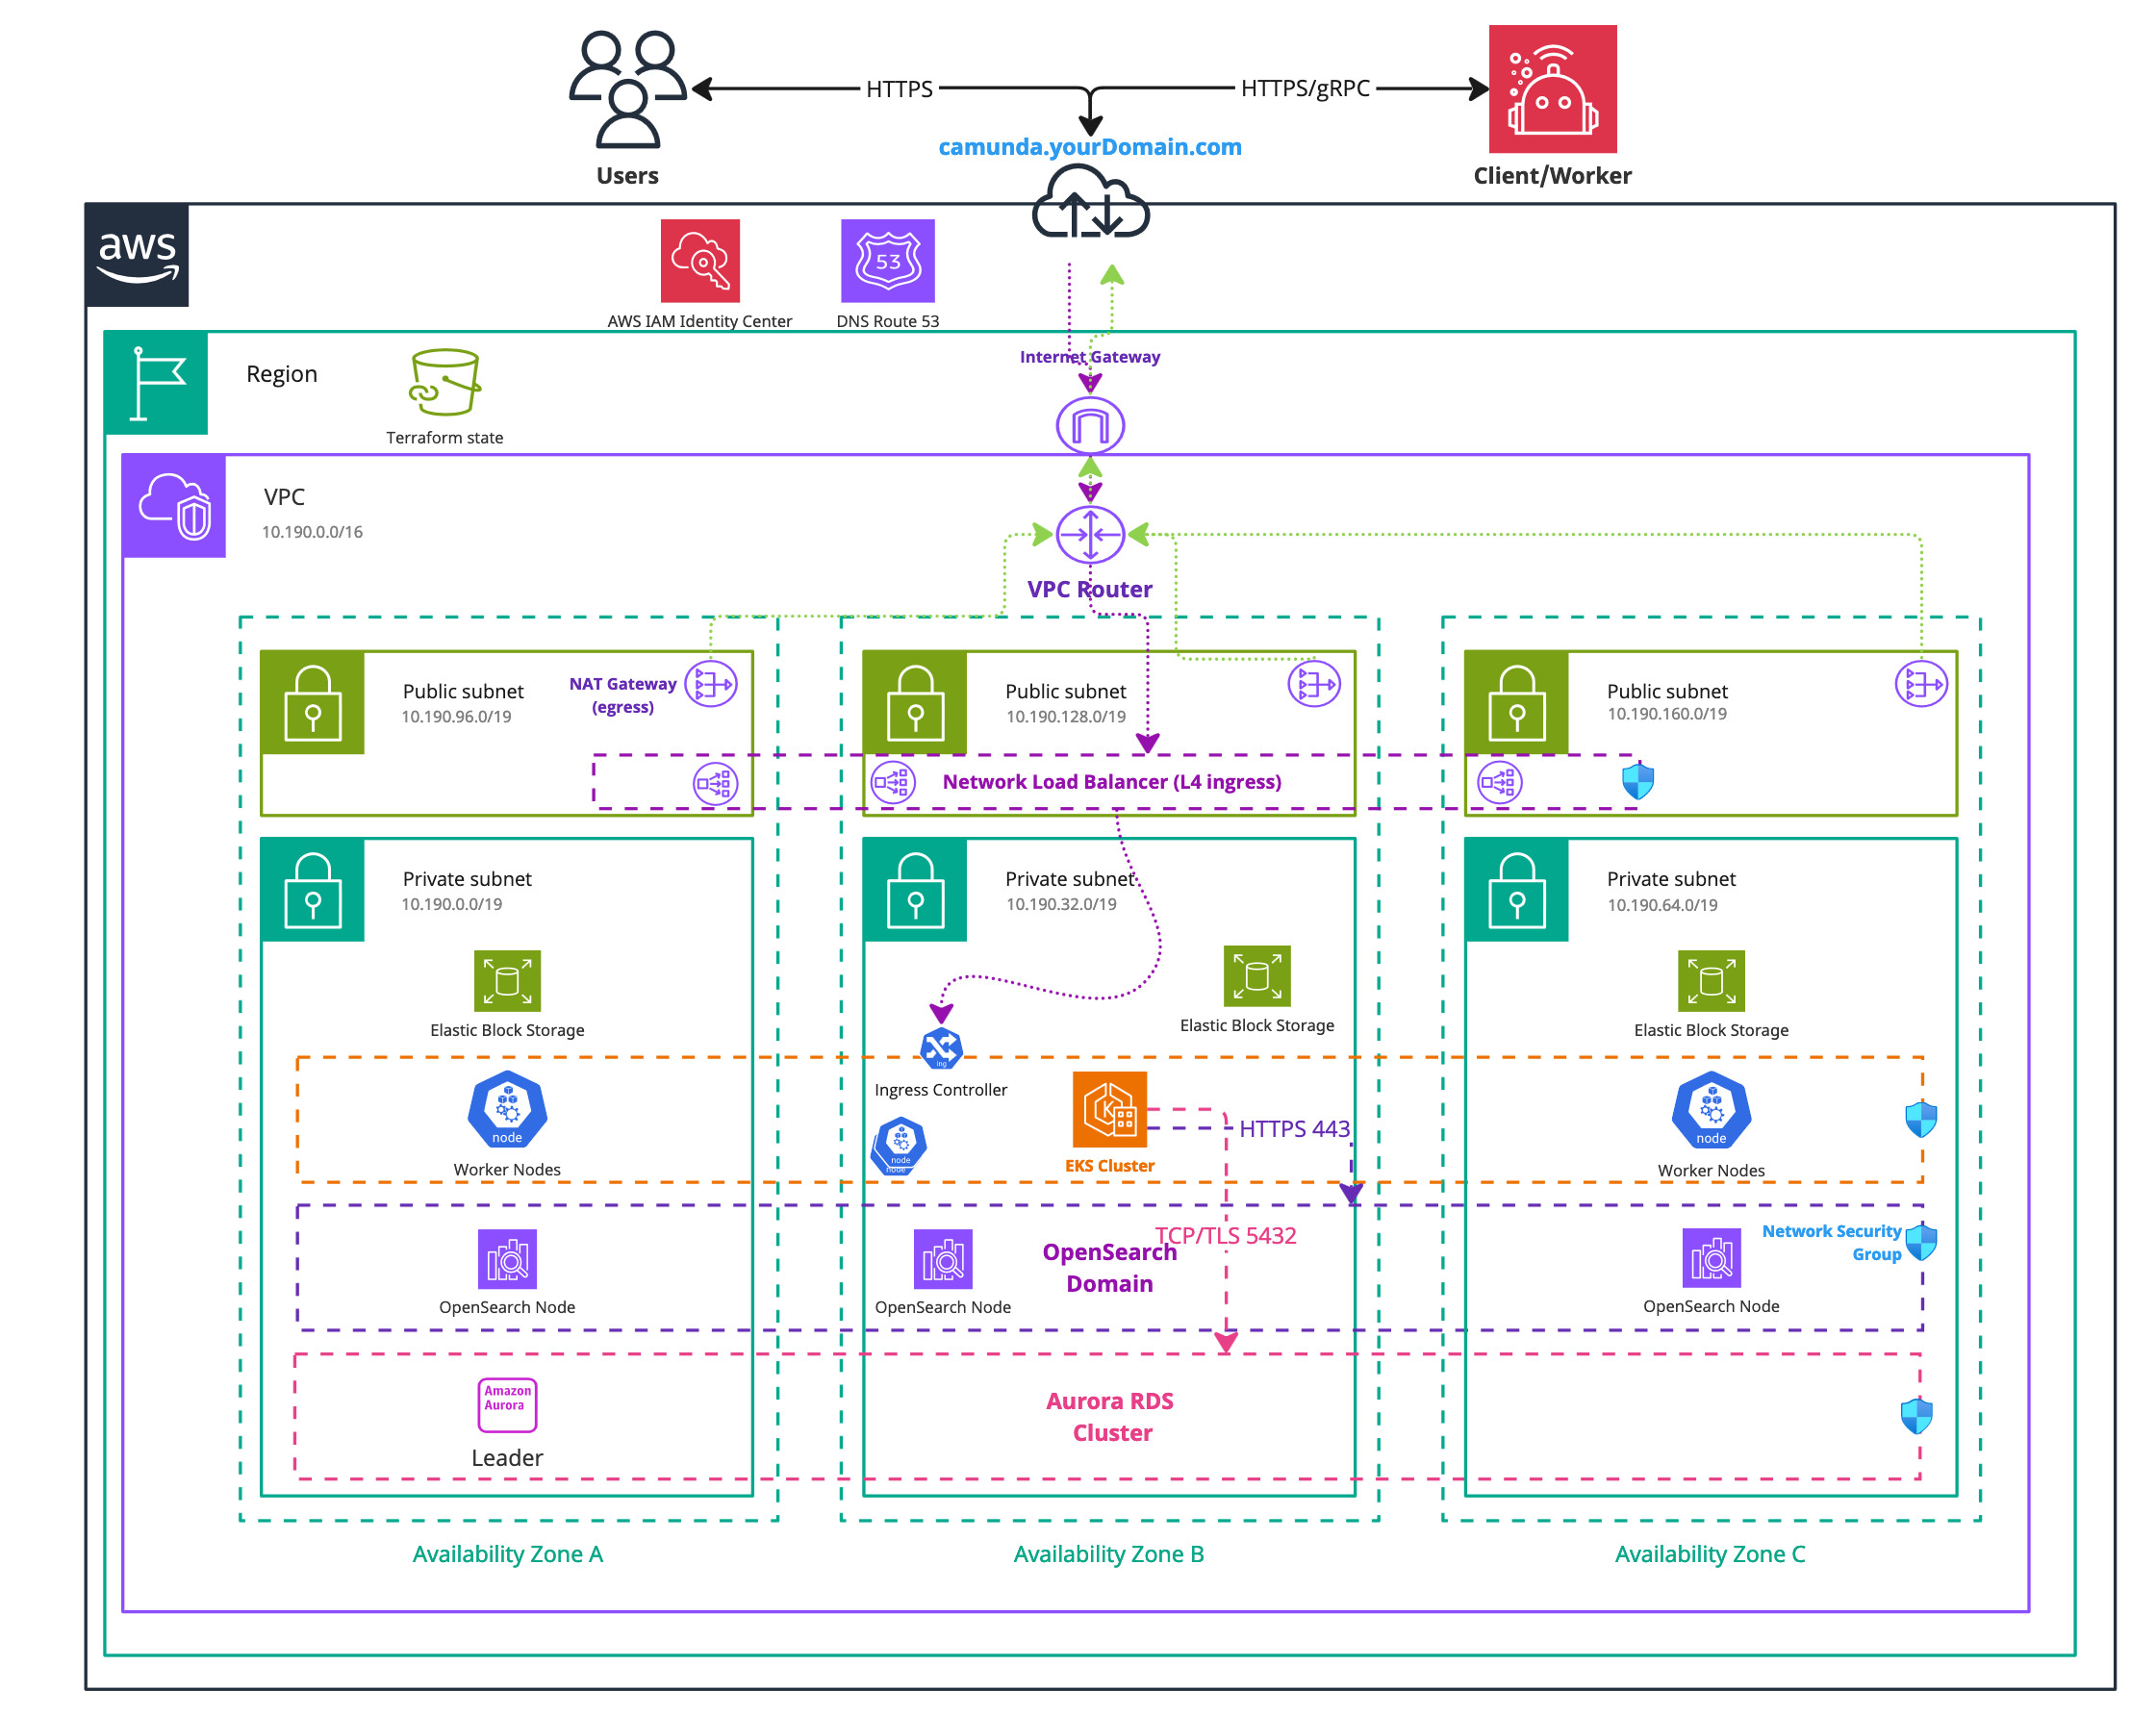
After completing this guide, you will have:
- An Amazon EKS Kubernetes cluster running with four nodes ready for Camunda 8 installation.
- The EBS CSI driver, installed and configured. This is used by the Camunda 8 Helm chart to create persistent volumes.
- (Optional) A managed Aurora PostgreSQL 15.x instance for Camunda.
- (Optional) A managed Amazon OpenSearch Service domain created and configured for use with the Camunda platform.
- (Optional) IRSA configured so Kubernetes workloads can assume IAM roles without stored credentials.
1. Configure AWS and initialize Terraform
Obtain a copy of the reference architecture
The first step is to download a copy of the reference architecture from the GitHub repository. This material will be used throughout the rest of this documentation. The reference architectures are versioned using the same Camunda versions (stable/8.x).
The provided reference architecture repository allows you to directly reuse and extend the existing Terraform example base. This sample implementation is flexible to extend to your own needs without the potential limitations of a Terraform module maintained by a third party.
- Standard
- IRSA
loading...
loading...
With the reference architecture copied, you can proceed with the remaining steps outlined in this documentation. Ensure that you are in the correct directory before continuing with further instructions.
Terraform prerequisites
To manage the infrastructure for Camunda 8 on AWS using Terraform, we need to set up Terraform's backend to store the state file remotely in an S3 bucket. This ensures secure and persistent storage of the state file.
Advanced users may want to handle this part differently and use a different backend. The backend setup provided is an example for new users.
Set up AWS authentication
The AWS Terraform provider is required to create resources in AWS. Before you can use the provider, you must authenticate it using your AWS credentials.
A user who creates resources in AWS will always retain administrative access to those resources, including any Kubernetes clusters created. It is recommended to create a dedicated AWS IAM user for Terraform purposes, ensuring that the resources are managed and owned by that user.
You can further change the region and other preferences and explore different authentication methods:
-
For development or testing purposes you can use the AWS CLI. If you have configured your AWS CLI, Terraform will automatically detect and use those credentials. To configure the AWS CLI:
aws configureEnter your
AWS_ACCESS_KEY_ID,AWS_SECRET_ACCESS_KEY, region, and output format. These can be retrieved from the AWS Console. -
For production environments, we recommend the use of a dedicated IAM user. Create access keys for the new IAM user via the console, and export them as
AWS_ACCESS_KEY_IDandAWS_SECRET_ACCESS_KEY.
Create an S3 bucket for Terraform state management
Before setting up Terraform, you need to create an S3 bucket that will store the state file. This is important for collaboration and to prevent issues like state file corruption.
To start, set the region as an environment variable upfront to avoid repeating it in each command:
export AWS_REGION=<your-region>
Replace <your-region> with your chosen AWS region (for example, eu-central-1).
Now, follow these steps to create the S3 bucket with versioning enabled:
-
Open your terminal and ensure the AWS CLI is installed and configured.
-
Run the following command to create an S3 bucket for storing your Terraform state. Make sure to use a unique bucket name and set the
AWS_REGIONenvironment variable beforehand:aws/common/procedure/s3-bucket/s3-bucket-creation.shloading... -
Enable versioning on the S3 bucket to track changes and protect the state file from accidental deletions or overwrites:
aws/common/procedure/s3-bucket/s3-bucket-versioning.shloading... -
Secure the bucket by blocking public access:
aws/common/procedure/s3-bucket/s3-bucket-private.shloading... -
Verify versioning is enabled on the bucket:
aws/common/procedure/s3-bucket/s3-bucket-verify.shloading...
This S3 bucket will now securely store your Terraform state files with versioning enabled.
Initialize Terraform
Once your authentication is set up, you can initialize your Terraform project. The previous steps configured a dedicated S3 Bucket (S3_TF_BUCKET_NAME) to store your state, and the following creates a bucket key that will be used by your configuration.
Configure the backend and download the necessary provider plugins:
loading...
Terraform will connect to the S3 bucket to manage the state file, ensuring remote and persistent storage.
EKS cluster module setup
This module provides the foundational configuration for AWS access and Terraform usage.
We use Terraform modules to abstract resources into reusable components and simplify infrastructure management.
The Camunda AWS EKS cluster module is publicly available and serves as a robust starting point for deploying an Amazon EKS cluster. Review the module before implementation to understand its structure and capabilities.
The module is locally sourced in your clone. Any changes you make to the module in your repository take effect immediately in your setup.
Set up the EKS cluster module
-
Go to the reference architecture directory of the cloned repository.
Verify the layout, and switch into the cluster module:
   cd ./aws/kubernetes/eks-single-region(-irsa)/terraform/

   ls
   # Example output:
   # cluster  vpn

cd cluster -
Review
cluster.tf. It references the local Terraform module and contains a basic cluster setup that you can adjust to your needs. The file is available here:- Standard
- IRSA
aws/kubernetes/eks-single-region/terraform/cluster/cluster.tfloading...aws/kubernetes/eks-single-region-irsa/terraform/cluster/cluster.tfloading... -
Configure user access to the cluster. By default, the user who creates the Amazon EKS cluster has administrative access.
Grant cluster access to other users
If you want to grant access to other users, you can configure this by using the
access_entriesinput.Amazon EKS access management is divided into two distinct layers:
-
The first layer involves AWS IAM permissions, which allow basic Amazon EKS functionalities such as interacting with the Amazon EKS UI and generating EKS access through the AWS CLI. The module handles this part for you by creating the necessary IAM roles and policies.
-
The second layer controls cluster access within Kubernetes, defining the user's permissions inside the cluster (for example, policy association). This can be configured directly through the module's
access_entriesinput.
To manage user access, use the
access_entriesconfiguration:access_entries = {
example = {
kubernetes_groups = []
principal_arn = "<arn>"
policy_associations = {
example = {
policy_arn = "arn:aws:eks::aws:cluster-access-policy/AmazonEKSViewPolicy"
access_scope = {
namespaces = ["default"]
type = "namespace"
}
}
}
}
}In this configuration:
- Replace
principal_arnwith the ARN of the IAM user or role. - Use
policy_associationsto define policies for fine-grained access control.
For a full list of available policies, refer to the AWS EKS Access Policies documentation.
-
-
Customize the cluster setup. The module offers various input options that allow you to further customize the cluster configuration. For a comprehensive list of available options and detailed usage instructions, refer to the EKS module documentation.
Private clusterBy default, this cluster is accessible from the internet. To restrict access, set
private_vpc = true. This creates a private cluster that is only accessible through the private subnets of your VPC. Optionally, you can expose a public Ingress by setting theexpose_public_elbvariable in the EKS module.⚠️ Because private subnets are not reachable from the internet, you must connect your network to the cluster using either a bastion host or a Client VPN.
See the VPN module setup to configure an AWS Client VPN endpoint for secure access to the private cluster.
PostgreSQL module setup
If you don't want to use this module, you can skip this section. However, you may need to adjust the remaining instructions to remove references to this module.
If you choose not to use this module, you must either provide a managed PostgreSQL service or use the internal deployment by the Camunda Helm chart in Kubernetes.
Additionally, you must delete the db.tf file in the terraform/cluster directory of your chosen reference. Otherwise, it will create the resources.
We separated the cluster and PostgreSQL modules to offer you more customization options.
Set up the Aurora PostgreSQL module
-
Go to the reference architecture directory of the cloned repository.
Verify the layout and switch into the cluster module. For simplicity, the PostgreSQL file is located in the cluster module:
   cd ./aws/kubernetes/eks-single-region(-irsa)/terraform/

   ls
   # Example output:
   # cluster  vpn

cd cluster -
The
db.tffile references the local Terraform module and contains a basic Aurora PostgreSQL setup that you can adjust to your needs. The file is available here:- Standard
- IRSA
aws/kubernetes/eks-single-region/terraform/cluster/db.tfloading...In addition to using standard username and password authentication, you can opt to use IRSA (IAM Roles for Service Accounts) for secure, role-based access to your Aurora database. This method allows your EKS workloads to assume IAM roles without needing to manage AWS credentials directly.
noteUsing IRSA is optional. If preferred, you can continue using traditional password-based authentication for database access.
If you choose to use IRSA, you'll need to take note of the IAM role created for Aurora and the AWS Account ID, as these will be used later to annotate the Kubernetes service account.
Aurora IRSA role and policy
The Aurora module uses outputs from the EKS cluster module to configure the IRSA role and policy. Below are the required parameters:
Here's how to define the IAM role trust policy and access policy for Aurora:
aws/kubernetes/eks-single-region-irsa/terraform/cluster/db.tfloading...Once the IRSA configuration is complete, ensure you record the IAM role name (from the
iam_aurora_role_nameconfiguration), it is required to annotate the Kubernetes service account in the next step. -
Customize the Aurora cluster setup through various input options. Refer to the Aurora module documentation for more details on other customization options.
OpenSearch module setup
If you don't want to use this module, you can skip this section. However, you may need to adjust the remaining instructions to remove references to this module.
If you choose not to use this module, you'll need to either provide a managed Elasticsearch or OpenSearch service or use the internal deployment by the Camunda Helm chart in Kubernetes.
Additionally, you must delete the opensearch.tf file within the terraform/cluster directory of your chosen reference as it will otherwise create the resources.
The OpenSearch module creates an OpenSearch domain intended for Camunda platform. OpenSearch is a powerful alternative to Elasticsearch. For more information on using OpenSearch with Camunda, refer to the Camunda documentation.
Using Amazon OpenSearch Service requires setting up a new Camunda installation. Migration from previous Camunda versions using Elasticsearch environments is currently not supported. Switching between Elasticsearch and OpenSearch, in either direction, is also not supported.
Set up the OpenSearch domain module
-
Go to the reference architecture directory of the cloned repository.
Verify the layout and switch into the cluster module. For simplicity, the OpenSearch file is located in the cluster module:
   cd ./aws/kubernetes/eks-single-region(-irsa)/terraform/

   ls
   # Example output:
   # cluster  vpn

cd cluster -
The
opensearch.tfreferences the local Terraform module and contains a basic AWS OpenSearch setup that you can adjust to your needs. The file is available here:- Standard
- IRSA
Network based securityThe standard deployment for OpenSearch relies on the first layer of security, which is the Network. While this setup allows easy access, it may expose sensitive data. To enhance security, consider implementing IAM Roles for Service Accounts (IRSA) to restrict access to the OpenSearch cluster, providing a more secure environment. For more information, see the Amazon OpenSearch Service Fine-Grained Access Control documentation.
aws/kubernetes/eks-single-region/terraform/cluster/opensearch.tfloading...In addition to standard authentication, which uses anonymous users and relies on the network for access control, you can also use IRSA (IAM Roles for Service Accounts) to securely connect to OpenSearch. IRSA enables your Kubernetes workloads to assume IAM roles without managing AWS credentials directly.
noteUsing IRSA is optional. If you prefer, you can continue using password-based access to your OpenSearch domain.
If you choose to use IRSA, you'll need to take note of the IAM role name created for OpenSearch and the AWS Account ID, as these will be required later to annotate the Kubernetes service account.
OpenSearch IRSA role and policy
To configure IRSA for OpenSearch, the OpenSearch module uses outputs from the EKS cluster module to define the necessary IAM role and policies.
Here's an example of how to define the IAM role trust policy and access policy for OpenSearch, this configuration will deploy an OpenSearch domain with advanced security enabled:
aws/kubernetes/eks-single-region-irsa/terraform/cluster/opensearch.tfloading...Once the IRSA configuration is complete, ensure you record the IAM role name (from the
iam_opensearch_role_nameconfiguration), it is required to annotate the Kubernetes service account in the next step.As the OpenSearch domain has advanced security enabled and fine-grained access control, we will later use your provided master username (
advanced_security_master_user_name) and password (advanced_security_master_user_password) to perform the initial setup of the security component, allowing the created IRSA role to access the domain. -
Customize the cluster setup using various input options. For a full list of available parameters, see the OpenSearch module documentation.
The instance type m7i.large.search in the above example is a suggestion, and can be changed depending on your needs.
Create the EKS cluster, PostgreSQL, and OpenSearch domain
After configuring the cluster module (which includes EKS, PostgreSQL, and OpenSearch), use Terraform to plan and create the resources.
We strongly recommend managing sensitive information such as the OpenSearch, Aurora username and password using a secure secrets management solution like HashiCorp Vault. For details on how to inject secrets directly into Terraform via Vault, see the Terraform Vault Secrets Injection Guide.
-
Open a terminal in the chosen reference folder where
config.tfand other.tffiles are.cd ./aws/kubernetes/eks-single-region(-irsa)/terraform/
ls
# Example output:
# cluster vpn
cd cluster -
Perform a final initialization for anything changed throughout the guide:
aws/common/procedure/s3-bucket/s3-bucket-tf-init.shloading... -
Plan the configuration files:
terraform plan -out cluster.plan # describe what will be created -
After reviewing the plan, you can confirm and apply the changes.
terraform apply cluster.plan # apply the creation
Terraform will now create the Amazon EKS cluster with all the necessary configurations. The completion of this process may require approximately 20-30 minutes for each component.
Define outputs
Terraform lets you define outputs, which make it easier to retrieve important values generated during execution, such as database endpoints and other configuration details needed for the Helm setup.
Each module definition set up in the reference contains an output definition at the end of the file. You can adjust them as needed.
Outputs let you easily referenc values such as the cert-manager ARN, external-dns ARN, and the endpoints for PostgreSQL and OpenSearch in subsequent steps or scripts, streamlining your deployment process.
VPN module setup
You can optionally set up an AWS VPN endpoint to access a private cluster.
This step is only required if you configured a private cluster.
Using a VPN offers a flexible and secure way to connect to the private subnets within your VPC. It can be used either by a user to access cluster resources or to enable cross-site communications via PrivateLink. This module focuses on user access.
Infrastructure diagram for a single region EKS setup with VPN (click on the image to open the PDF version)
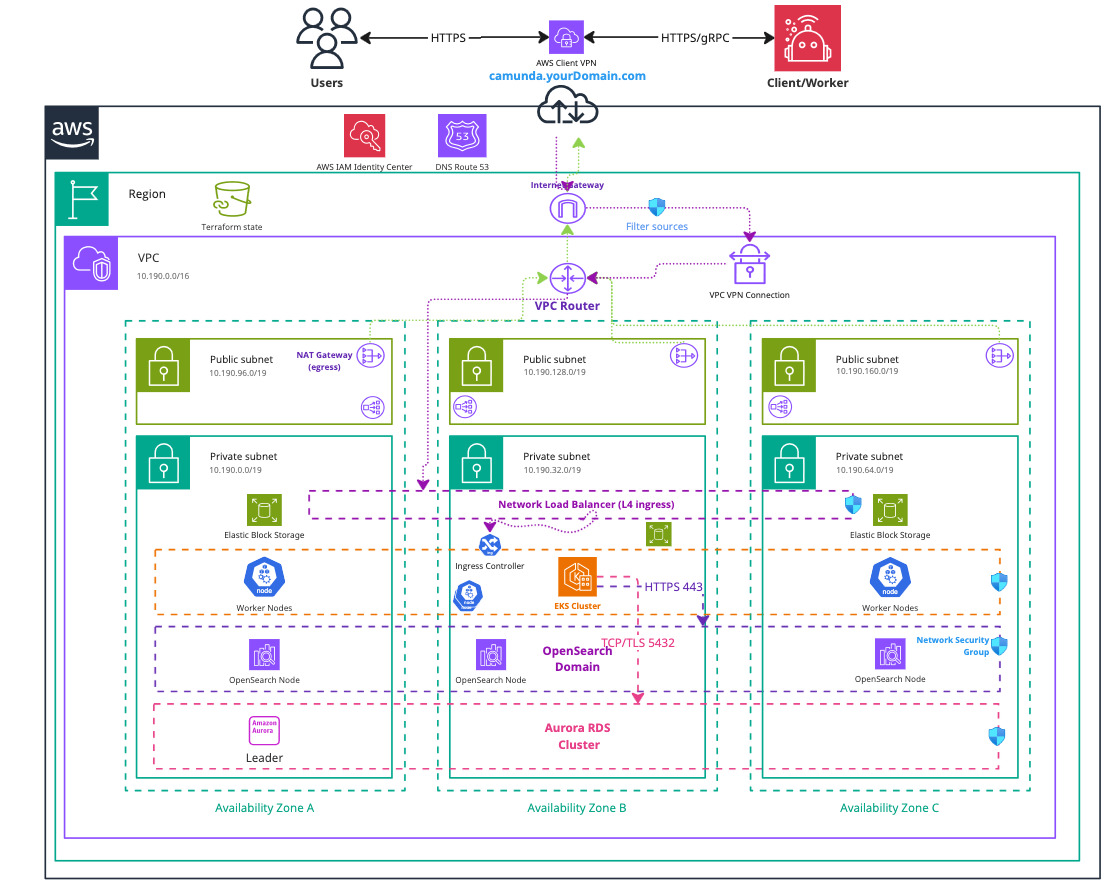
AWS VPN technology is compatible with OpenVPN clients. It uses x509 certificates for mutual authentication and source verification. The encryption provided by these certificates ensures that traffic can securely transit over the internet to the AWS VPN endpoint, which performs NAT and routes the traffic directly into the private subnets. This VPN endpoint then becomes the sole access point to the private cluster.
Retrieve the VPC cluster ID
To create the VPN Endpoint in your cluster's VPC, you need to retrieve the VPC ID using Terraform outputs from the EKS cluster module. Follow these steps:
-
Go to the reference architecture directory of the cloned repository and switch into the
clustermodule directory:cd ./aws/kubernetes/eks-single-region/terraform/
ls
# Example output:
# cluster vpn
cd cluster -
Export the VPC ID to an environment variable:
export CLUSTER_VPC_ID="$(terraform output -raw vpc_id)"
echo "CLUSTER_VPC_ID=$CLUSTER_VPC_ID"
Set up the VPN module
From the parent directory of your cluster module, go to the vpn directory which holds the VPN endpoint configuration.
This setup creates a Certificate Authority (CA) for AWS VPN to perform encryption and mutual client authentication. For simplicity, the CA and generated certificates are stored in the project’s Terraform state (tfstate). You may customize this as needed.
-
Review
config.tf, which configures the S3 backend for Terraform state management:aws/kubernetes/eks-single-region/terraform/vpn/config.tfloading... -
Review
vpn.tf, which defines the VPC Client endpoint configuration:aws/kubernetes/eks-single-region/terraform/vpn/vpn.tfloading...
This VPN Client Endpoint follows AWS best practices and constraints:
- Uses a client CIDR range that does not overlap with the VPC CIDR or any manually added VPN route table routes.
- Implements split-tunnel routing, so only traffic for the VPC goes through the VPN, minimizing bandwidth use.
- Supports IPv4 only and is bound to the VPC’s private subnets.
Initialize and configure Terraform:
-
Set your Terraform state key, initialize Terraform with the S3 backend, and download necessary provider plugins:
export S3_TF_BUCKET_KEY_VPN="camunda-terraform/vpn.tfstate"

echo "Storing cluster terraform state in s3://$S3_TF_BUCKET_NAME/$S3_TF_BUCKET_KEY_VPN"

terraform init -backend-config="bucket=$S3_TF_BUCKET_NAME" -backend-config="key=$S3_TF_BUCKET_KEY_VPN" -backend-config="region=$S3_TF_BUCKET_REGION"
Terraform will connect to the S3 bucket to manage the state file, ensuring remote and persistent storage.
-
For each client connecting to the cluster, assign a unique name in
client_key_namesto simplify certificate revocation. -
By default, VPN access is allowed from any IP address. Restrict access by adjusting the
vpn_allowed_cidr_blocksvariable. -
Review and adjust the configuration for your network design.
-
For customization options, see the VPN module documentation.
Outputs
The module stores certificates and VPN client configurations in the Terraform state. The next section explains how to retrieve and use client configurations.
Execution
-
Generate a Terraform plan for the VPN Client endpoint configuration. This will use the private subnets of the designated VPC:
# describe what will be created
terraform plan -out vpn.plan \
-var vpc_id="$CLUSTER_VPC_ID" -
Review and apply the plan to create the resources:
terraform apply vpn.plan # creates the resources
Creating the VPN Client endpoint typically takes about 10 minutes. After completion, the Terraform output vpn_client_configs provides the client configuration files.
2. Preparation for Camunda 8 installation
Access to the private network using the VPN
This section applies if you have previously created a private cluster and want to access it using the VPN module configured earlier.
-
Navigate to the VPN module directory (
vpn):pwd
# Example output:
# ./camunda-deployment-references/aws/kubernetes/eks-single-region(-irsa)/terraform/vpn/ -
Generate your client’s VPN configuration file. This file is compatible with OpenVPN (ovpn) format:
aws/common/procedure/vpn/gather-vpn-config.shloading... -
Import the generated configuration file (
my-client.ovpn) into an OpenVPN client:- (preferred) Official AWS VPN Client
- Other OpenVPN Clients
-
Once the VPN client is connected, you will have secure access to the VPC’s private network.
Access the created EKS cluster
You can gain access to the Amazon EKS cluster via the AWS CLI using the following command:
export CLUSTER_NAME="$(terraform console <<<local.eks_cluster_name | jq -r)"

aws eks --region "$AWS_REGION" update-kubeconfig --name "$CLUSTER_NAME" --alias "$CLUSTER_NAME"
After updating the kubeconfig, you can verify your connection to the cluster with kubectl:
kubectl get nodes
Create a namespace for Camunda:
export CAMUNDA_NAMESPACE="camunda"
kubectl create namespace "$CAMUNDA_NAMESPACE"
In the remainder of the guide, we reference the CAMUNDA_NAMESPACE variable as the namespace to create some required resources in the Kubernetes cluster, such as secrets or one-time setup jobs.
Configure a high-performance StorageClass
Camunda 8 requires high IOPS for performance-critical components such as Zeebe. To achieve this, use AWS gp3 volumes instead of the default gp2.
This step defines a custom StorageClass that:
- Uses
gp3EBS volumes with optimized IOPS and throughput. - Sets a
Retainreclaim policy. - Uses
WaitForFirstConsumervolume binding. - Becomes the default
StorageClassfor the cluster.
Apply the StorageClass
Run the following script to apply the new storage class and set it as default:
loading...
To verify completion of the operation, run:
loading...
You must apply the custom StorageClass before installing the Camunda Helm chart so that PersistentVolumeClaims (PVCs) are provisioned with the correct performance characteristics.
Export values for the Helm chart
After configuring and deploying your infrastructure with Terraform, follow these instructions to export key values for use in Helm charts to deploy Camunda 8 on Kubernetes.
The following commands will export the required outputs as environment variables. You may need to omit some if you have chosen not to use certain modules. These values will be necessary for deploying Camunda 8 with Helm charts:
- Standard
- IRSA
loading...
loading...
To authenticate and authorize access to PostgreSQL and OpenSearch, you do not need to export the PostgreSQL or OpenSearch passwords, IRSA will handle the authentication.
However, you will still need to export the relevant usernames and other settings to Helm.
Ensure that you use the actual values you passed to the Terraform module during the setup of PostgreSQL and OpenSearch.
Configure the database and associated access
As you now have a database, you need to create dedicated databases for each Camunda component and an associated user that have a configured access. Follow these steps to create the database users and configure access.
You can access the created database in the following ways:
- Bastion host: Set up a bastion host within the same network to securely access the database.
- Pod within the EKS cluster: Deploy a pod in your EKS cluster equipped with the necessary tools to connect to the database. See Access internal infrastructure.
- VPN: Establish a VPN connection to the VPC where the Aurora Cluster resides, allowing secure access from your local machine or another network.
The choice depends on your infrastructure setup and security preferences. In this guide, we'll use a pod within the EKS cluster to configure the database.
-
In your terminal, set the necessary environment variables that will be substituted in the setup manifest:
aws/kubernetes/eks-single-region/procedure/vars-create-db.shloading...A Kubernetes job will connect to the database and create the necessary users with the required privileges. The script installs the necessary dependencies and runs SQL commands to create the IRSA user and assign it the correct roles and privileges.
-
Create a secret that references the environment variables:
- Standard
- IRSA
aws/kubernetes/eks-single-region/procedure/create-setup-db-secret.shloading...This command creates a secret named
setup-db-secretand dynamically populates it with the values from your environment variables.After running the above command, you can verify that the secret was created successfully by using:
kubectl get secret setup-db-secret -o yaml --namespace "$CAMUNDA_NAMESPACE"This should display the secret with the base64 encoded values.
aws/kubernetes/eks-single-region-irsa/procedure/create-setup-db-secret.shloading...This command creates a secret named
setup-db-secretand dynamically populates it with the values from your environment variables.After running the above command, you can verify that the secret was created successfully by using:
kubectl get secret setup-db-secret -o yaml --namespace "$CAMUNDA_NAMESPACE"This should display the secret with the base64 encoded values.
-
Save the following manifest to a file, for example,
setup-postgres-create-db.yml.- Standard
- IRSA
aws/kubernetes/eks-single-region/setup-postgres-create-db.ymlloading...aws/kubernetes/eks-single-region-irsa/setup-postgres-create-db.ymlloading... -
Apply the manifest:
kubectl apply -f setup-postgres-create-db.yml --namespace "$CAMUNDA_NAMESPACE"Once the secret is created, the Job manifest from the previous step can consume this secret to securely access the database credentials.
-
Once the job is created, monitor its progress using:
kubectl get job/create-setup-user-db --namespace "$CAMUNDA_NAMESPACE" --watchOnce the job shows as
Completed, the users and databases will have been successfully created. -
View the logs of the job to confirm that the users were created and privileges were granted successfully:
kubectl logs job/create-setup-user-db --namespace "$CAMUNDA_NAMESPACE" -
Clean up the resources:
kubectl delete job create-setup-user-db --namespace "$CAMUNDA_NAMESPACE"
kubectl delete secret setup-db-secret --namespace "$CAMUNDA_NAMESPACE"
Running these commands cleans up both the job and the secret, ensuring that no unnecessary resources remain in the cluster.
Configure OpenSearch fine grained access control
As you now have an OpenSearch domain, you need to configure the related access for each Camunda component.
You can access the created OpenSearch domain in the following ways:
- Bastion host: Set up a bastion host within the same network to securely access the OpenSearch domain.
- Pod within the EKS cluster: Deploy a pod in your EKS cluster equipped with the necessary tools to connect to the OpenSearch domain. See Access internal infrastructure.
- VPN: Establish a VPN connection to the VPC where the OpenSearch domain resides, allowing secure access from your local machine or another network.
The choice depends on your infrastructure setup and security preferences. In this tutorial, we'll use a pod within the EKS cluster to configure the domain.
- Standard
- IRSA
The standard installation comes already pre-configured, and no additional steps are required.
-
In your terminal, set the necessary environment variables that will be substituted in the setup manifest:
aws/kubernetes/eks-single-region-irsa/procedure/vars-create-os.shloading...A Kubernetes job will connect to the OpenSearch dommain and configure it.
-
Create a secret that references the environment variables:
aws/kubernetes/eks-single-region-irsa/procedure/create-setup-os-secret.shloading...This command creates a secret named
setup-os-secretand dynamically populates it with the values from your environment variables.After running the above command, you can verify that the secret was created successfully by using:
kubectl get secret setup-os-secret -o yaml --namespace "$CAMUNDA_NAMESPACE"This should display the secret with the base64 encoded values.
-
Save the following manifest to a file, for example,
setup-opensearch-fgac.yml.aws/kubernetes/eks-single-region-irsa/setup-opensearch-fgac.ymlloading... -
Apply the manifest:
kubectl apply -f setup-opensearch-fgac.yml --namespace "$CAMUNDA_NAMESPACE"Once the secret is created, the Job manifest from the previous step can consume this secret to securely access the OpenSearch domain credentials.
-
Once the job is created, monitor its progress using:
kubectl get job/setup-opensearch-fgac --namespace "$CAMUNDA_NAMESPACE" --watchOnce the job shows as
Completed, the OpenSearch domain is configured correctly for fine grained access control. -
View the logs of the job to confirm that the privileges were granted successfully:
kubectl logs job/setup-opensearch-fgac --namespace "$CAMUNDA_NAMESPACE" -
Clean up the resources:
kubectl delete job setup-opensearch-fgac --namespace "$CAMUNDA_NAMESPACE"
kubectl delete secret setup-os-secret --namespace "$CAMUNDA_NAMESPACE"
Running these commands will clean up both the job and the secret, ensuring that no unnecessary resources remain in the cluster.
Access internal infrastructure
These approaches are intended for development and troubleshooting purposes only. For a production cluster, use a proper VPN or other secure access methods.
Some infrastructure components, such as OpenSearch dashboards or Aurora PostgreSQL databases, are accessible only from inside the Virtual Private Cloud (VPC). You can use a temporary pod as a jump host to tunnel traffic to these components.
Generic approach using a jump host
Component connection details
Export REMOTE_HOST, REMOTE_PORT, and LOCAL_PORT with the component-specific values:
| Component | REMOTE_HOST | REMOTE_PORT | LOCAL_PORT |
|---|---|---|---|
| OpenSearch dashboard | $OPENSEARCH_HOST | 443 | 9200 |
| Aurora PostgreSQL | $AURORA_ENDPOINT | $AURORA_PORT | 5432 |
-
Run a socat pod to create a TCP tunnel:
kubectl --namespace $CAMUNDA_NAMESPACE run my-jump-pod -it \
--image=alpine/socat \
--tty --rm \
--restart=Never \
--expose=true --port=$REMOTE_PORT -- \
tcp-listen:$REMOTE_PORT,fork,reuseaddr \
tcp-connect:$REMOTE_HOST:$REMOTE_PORT
How it workssocat (SOcket CAT) is a command-line tool that relays data between two network endpoints.
In this command:
tcp-listen:$REMOTE_PORT,fork,reuseaddrlistens on the specified port in the pod and can handle multiple connections.tcp-connect:$REMOTE_HOST:$REMOTE_PORTforwards all incoming traffic to the internal component endpoint.
Combined with
kubectl port-forward(step 2), the flow is:Local Client → localhost:$LOCAL_PORT → port-forward → my-jump-pod:$REMOTE_PORT → socat → Remote ComponentThis setup lets you securely reach internal components without exposing them publicly.
-
Port-forward the pod to your local machine:
kubectl port-forward --namespace $CAMUNDA_NAMESPACE pod/my-jump-pod $LOCAL_PORT:$REMOTE_PORT -
Connect to the component:
OpenSearch example:
https://localhost:$LOCAL_PORT/_dashboardsAccept the insecure connection if prompted.
Aurora PostgreSQL example:
PGPASSWORD=$AURORA_PASSWORD psql -h localhost -p $LOCAL_PORT -U $AURORA_USERNAME -d <DATABASE>
3. Install Camunda 8 using the Helm chart
Now that you've exported the necessary values, you can proceed with installing Camunda 8 using Helm charts. Follow the guide Camunda 8 on Kubernetes for detailed instructions on deploying the platform to your Kubernetes cluster.