Camunda Helm chart
The 13.0.0-alpha4.1 Helm chart released with Camunda 8.8.0-alpha4 introduces a new default setup to support the 8.8 Identity management updates. Currently, this setup is limited to the following components:
- The Orchestration core (Zeebe, Operate, Tasklist, and Orchestration Cluster Identity)
- Connectors
This temporary limitation will be resolved in subsequent alpha releases.
We recommend using Kubernetes and Helm to deploy and run Camunda 8 Self-Managed in production environments.
There are many ways to provision and configure a Kubernetes cluster, and several architectural decisions to consider. For example: Will your workers run inside the Kubernetes cluster or externally? You'll need to configure the cluster accordingly and tailor the setup to your architecture.
Camunda provides continuously improved Helm charts that are not tied to any specific cloud provider, allowing you to choose your preferred Kubernetes platform. These charts are available in the Camunda Helm repository, and we encourage you to report issues.
What is Helm?
Helm is a package manager for Kubernetes resources. It allows you to install a set of components by referencing a chart name and overriding configurations to suit various deployment scenarios.
Helm also manages dependencies between charts, so that multiple components can be installed and configured with a single command.
For more details, refer to the full list of Helm values.
Components
The following charts are installed as part of the Camunda 8 Self-Managed platform:
- Zeebe: Deploys a Zeebe cluster with three brokers using the
camunda/zeebeDocker image. - Zeebe Gateway: Deploys a standalone Zeebe Gateway with two replicas.
- Operate: Deploys Operate, which connects to an existing Elasticsearch cluster.
- Tasklist: Deploys Tasklist to support user task management.
- Optimize: Deploys Optimize for analyzing historic process execution data.
- Identity: Deploys the Identity component for authentication and authorization.
- Connectors: Deploys the connectors component for integration with external systems.
- Elasticsearch: Deploys an Elasticsearch cluster with two nodes.
- Web Modeler: Deploys Web Modeler for collaborative BPMN modeling.
- Note: This chart is disabled by default and must be enabled explicitly.
- Console: Deploys Camunda Console Self-Managed.
- Note: This chart is also disabled by default and must be enabled explicitly.
The existing Helm charts are configured to use Elasticsearch by default, but they can also be configured to connect to Amazon OpenSearch Service. Refer to the guide on using Amazon OpenSearch Service.
Zeebe: Configure the OpenSearch exporter.
Operate, Tasklist, and Optimize: These components use the same configuration keys for both Elasticsearch and OpenSearch. To switch, replace the elasticsearch prefix with opensearch and provide the corresponding values.
For example, CAMUNDA_OPERATE_ELASTICSEARCH_URL becomes CAMUNDA_OPERATE_OPENSEARCH_URL. For Optimize, ensure variables use the proper prefix, such as OPTIMIZE_ELASTICSEARCH_HTTP_PORT becoming CAMUNDA_OPTIMIZE_OPENSEARCH_HTTP_PORT.
Refer to the configuration documentation for each component for additional parameters:
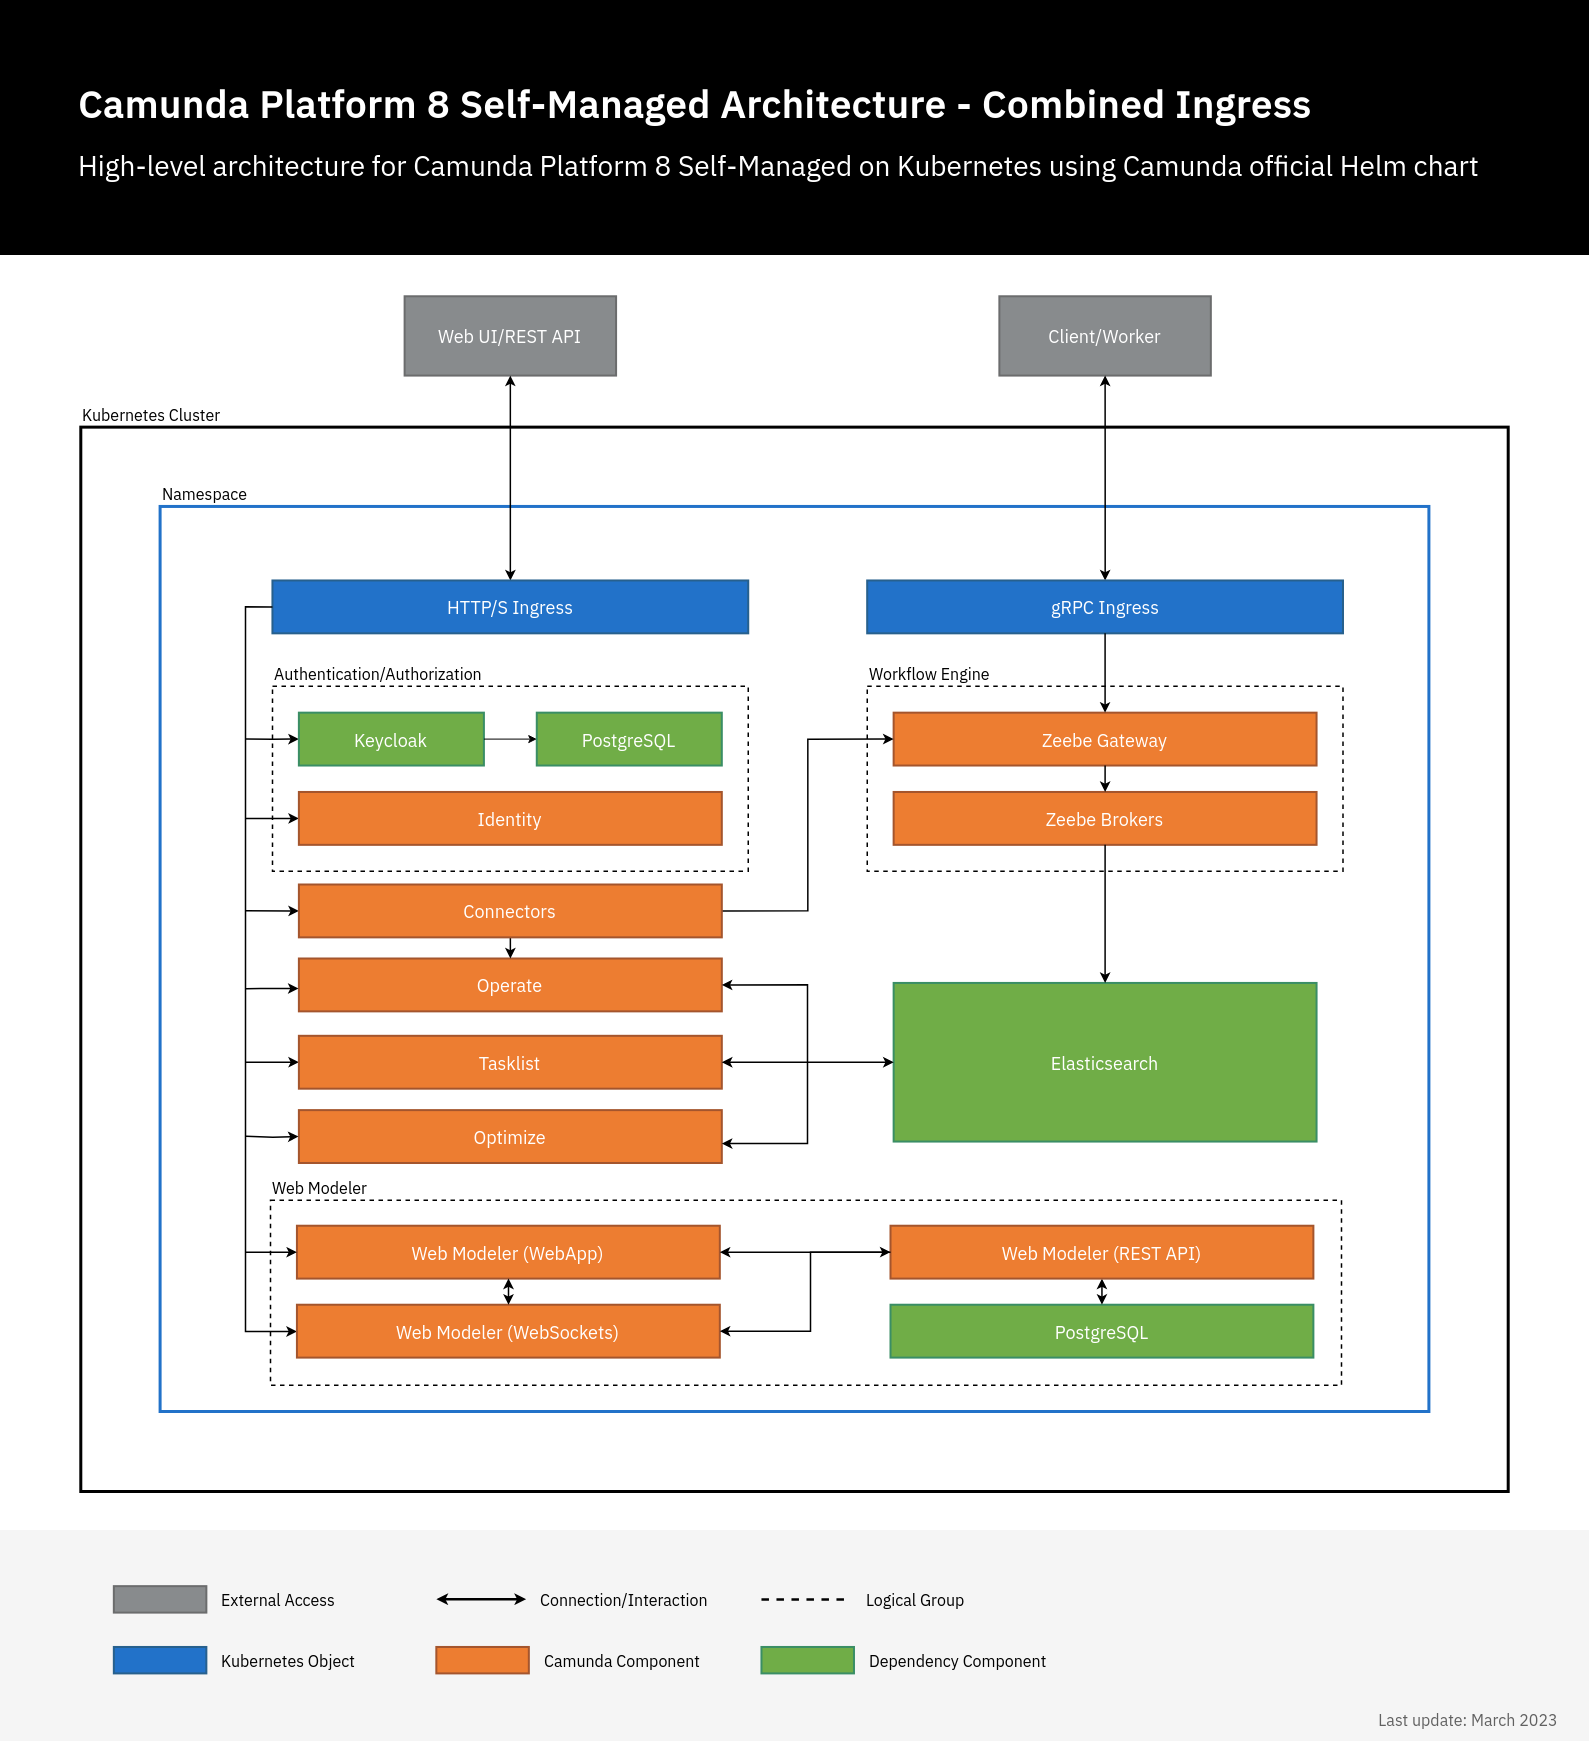
When you install the camunda-platform Helm chart, all components shown in the architecture diagram above are installed.
Helm also supports document storage and management with document handling.
Versioning
Starting with Camunda 8.4 (January 2024), the Helm chart version is decoupled from the application version. For example, the chart version may be 9.0.0 while the application version is 8.4.x.
To see which application versions are included in a specific Helm chart, refer to the full version matrix.
Installation
At helm.camunda.io, you’ll find a Helm chart that configures a 3-broker cluster with:
- Two Elasticsearch instances
- Operate
- Two Zeebe Gateways
- Tasklist
This configuration is comparable to the Production-S cluster plan in Camunda 8 SaaS and should be sufficient for approximately 80% of use cases.
Prerequisites
Before deploying Camunda using Helm, ensure you have the following:
Helm repository
To use the Camunda charts, first add the Camunda Helm chart repository. Once added, Helm can fetch and install charts from https://helm.camunda.io.
helm repo add camunda https://helm.camunda.io
helm repo update
Create Identity secrets
In the default configuration, Helm charts automatically generate all required Camunda Identity secrets for communication between Camunda 8 components and Identity.
However, due to an issue with a Bitnami library, running future helm upgrade commands may unintentionally regenerate these secrets.
While upgrades are still possible by following our upgrade guide, we recommend pre-creating these secrets to ensure a smoother upgrade process. This is especially helpful when using CI/CD tools such as ArgoCD, FluxCD, or Jenkins.
Below is an example of a pre-created secret:
apiVersion: v1
kind: Secret
metadata:
  name: identity-secret-for-components
type: Opaque
data:
  operate-secret: VmVyeUxvbmdTdHJpbmc=
  tasklist-secret: VmVyeUxvbmdTdHJpbmc=
  optimize-secret: VmVyeUxvbmdTdHJpbmc=
  connectors-secret: VmVyeUxvbmdTdHJpbmc=
  console-secret: VmVyeUxvbmdTdHJpbmc=
  keycloak-secret: VmVyeUxvbmdTdHJpbmc=
  zeebe-secret: VmVyeUxvbmdTdHJpbmc=
Add the following configuration parameters to your values.yaml file
global:
  identity:
    auth:
      operate:
        existingSecret:
          name: identity-secret-for-components
      tasklist:
        existingSecret:
          name: identity-secret-for-components
      optimize:
        existingSecret:
          name: identity-secret-for-components
      webModeler:
        existingSecret:
          name: identity-secret-for-components
      connectors:
        existingSecret:
          name: identity-secret-for-components
      console:
        existingSecret:
          name: identity-secret-for-components
      zeebe:
        existingSecret:
          name: identity-secret-for-components
Once this is completed, you are ready to install the Helm chart hosted in the official Camunda Helm chart repo.
Install Camunda Helm chart
To install the available Camunda 8 components inside a Kubernetes cluster, you can simply run:
export HELM_CHART_VERSION="^13.0.0-alpha";
helm install camunda camunda/camunda-platform --version $HELM_CHART_VERSION --devel
--version $HELM_CHART_VERSION to reference the Helm chart version. For more details about Helm chart version, see versioning.You can use the -n flag to specify the Kubernetes namespace where the components should be installed.
By default, the command does not install Web Modeler or Console. To enable them, follow the respective installation instructions:
Installing all components in a cluster requires downloading all related Docker images to the Kubernetes nodes. The time this takes will vary depending on your cloud provider and network speed.
For air-gapped environments, refer to the guide on installing in an air-gapped environment.
By default, the Helm chart uses open-source images from Bitnami. For enterprise installations, Camunda recommends using enterprise images. See Install with vendor enterprise images for more information.
To check the progress of your deployment, confirm that the Kubernetes pods are up and running by using the following command:
kubectl get pods
This will return something similar to the following:
NAME                                           READY   STATUS              RESTARTS   AGE
camunda-keycloak-0                       0/1     Pending             0          4s
camunda-identity-6bb5d864cc-kk6dv        0/1     ContainerCreating   0          4s
camunda-operate-cb597fd76-6vr2x          0/1     ContainerCreating   0          4s
camunda-optimize-676955b547-vxts7        0/1     ContainerCreating   0          4s
camunda-connectors-1bba590ff-a63dc       0/1     ContainerCreating   0          4s
camunda-postgresql-0                     0/1     Pending             0          4s
camunda-tasklist-5bf5c56f7b-sdwg7        0/1     ContainerCreating   0          4s
camunda-zeebe-0                          0/1     Pending             0          4s
camunda-zeebe-1                          0/1     ContainerCreating   0          4s
camunda-zeebe-2                          0/1     Pending             0          4s
camunda-zeebe-gateway-657b774f95-bbcx5   0/1     ContainerCreating   0          4s
camunda-zeebe-gateway-657b774f95-gmlbm   0/1     Running             0          4s
elasticsearch-master-0                   0/1     Pending             0          4s
elasticsearch-master-1                   0/1     Init:0/1            0          4s
Wait for all Kubernetes pods to reach the Ready state. For example:
NAME                                           READY    STATUS    RESTARTS   AGE
elasticsearch-master-0                          1/1     Running   0          4m6s
camunda-operate-XXX                             1/1     Running   0          4m6s
camunda-connectors-XXX                          1/1     Running   0          4m6s
camunda-zeebe-0                                 1/1     Running   0          4m6s
camunda-tasklist-XXX                            1/1     Running   0          4m6s
camunda-zeebe-gateway                           1/1     Running   0          4m6s
Install the latest Camunda 8 version
When using the Camunda 8 Helm chart, it automatically selects the latest version of the Camunda 8 applications. However, since the Helm chart and the application components are released independently, there may be slight version discrepancies.
To ensure you're installing the latest version of both the chart and its application dependencies, use the following command:
# This will install the latest Camunda Helm chart with the latest applications/dependencies.
helm install camunda camunda/camunda-platform --version $HELM_CHART_VERSION \
    --values https://helm.camunda.io/camunda-platform/values/values-latest.yaml
To install a previous version of the Camunda components, use the following command structure:
# This will install Camunda Helm chart v8.1.x with the latest applications/dependencies of v8.1.x.
helm install camunda camunda/camunda-platform --version 8.1 \
    --values https://helm.camunda.io/camunda-platform/values/values-v8.1.yaml
Install with vendor enterprise images
By default, the Camunda Helm chart uses open-source images provided by Bitnami. For production environments, Camunda recommends using vendor enterprise images, which are hardened and supported versions of the open-source images.
These enterprise images:
- Are built on the Bitnami open-source stack
- Include critical CVE patches and security hardening
- Come with extended vendor support
- Are hosted in a private registry:
registry.camunda.cloud - Are available only to Camunda customers
Create a Kubernetes registry secret
To access the private registry, create a Kubernetes docker-registry secret using your Camunda Enterprise credentials:
kubectl create secret docker-registry registry-camunda-cloud \
  --docker-server=registry.camunda.cloud \
  --docker-username=<your-username> \
  --docker-password=<your-password> \
  --docker-email=unused@example.com
Replace <your-username> and <your-password> with your LDAP credentials.
To learn more, refer to the Kubernetes imagePullSecrets documentation.
Install the Helm chart with vendor enterprise images
Camunda provides a dedicated values file, values-enterprise.yaml, which overrides the default Bitnami image registry and tags to use enterprise images.
This file includes a reference to the commonVendorPullSecrets parameter, which defines the pull secret required to access the private registry.
commonVendorPullSecrets is required because global.image.pullSecrets does not apply to vendor charts.
By default, the secret name registry-camunda-cloud is used. You can override this using the --set flag, a custom values-enterprise.yaml file, or any other Helm value override mechanism.
Use the following command to install Camunda with enterprise vendor images and your registry secret:
helm install camunda camunda/camunda-platform --version $HELM_CHART_VERSION \
  --values https://raw.githubusercontent.com/camunda/camunda-platform-helm/main/charts/camunda-platform-8.8/values.yaml \
  --values https://raw.githubusercontent.com/camunda/camunda-platform-helm/main/charts/camunda-platform-8.8/values-enterprise.yaml
This will deploy Camunda with vendor-supported enterprise images, which are recommended for secure and stable production environments.
Accessing Camunda services
By default, Camunda services deployed in a Kubernetes cluster are not accessible from outside the cluster. However, there are several ways to expose these services externally:
- Port forwarding: This method allows you to direct traffic from your local machine to the cluster, making it possible to access Camunda services directly. For detailed instructions, refer to accessing components without Ingress.
- Ingress configuration: You can set up the NGINX Ingress controller to manage external service access. For detailed instructions, refer to the Ingress setup guide.
- EKS cluster installation: For those deploying Camunda 8 on an Amazon EKS cluster, refer to installing Camunda 8 on an EKS cluster.
Configure license key
Camunda 8 components can consume Enterprise license information using the following Helm configuration:
global:
  license:
    ## @param global.license.key if set, it will be exposed as "CAMUNDA_LICENSE_KEY" in all components, consumable as ENV_VAR.
    key:
    ## @param global.license.existingSecret you can provide an existing secret name for Camunda license secret.
    existingSecret:
    ## @param global.license.existingSecretKey you can provide the key within the existing secret object for Camunda license key.
    existingSecretKey:
If your installation of Camunda 8 requires a license key, update your values.yaml to include one of two options.
Option one: Enter your license key directly in global.license.key.
global:
  license:
    key: >-
      --------------- BEGIN CAMUNDA LICENSE KEY ---------------
      [...]
      ---------------  END CAMUNDA LICENSE KEY  ---------------
Option two: Provide a secret name and key in global.license.existingSecret and global.license.existingSecretKey.
Create a Kubernetes secret object as follows:
apiVersion: v1
kind: Secret
metadata:
  name: camunda-license
stringData:
  key: >-
    --------------- BEGIN CAMUNDA LICENSE KEY ---------------
    [...]
    ---------------  END CAMUNDA LICENSE KEY  ---------------
Then use the created Kubernetes secret object as follows:
global:
  license:
    existingSecret: "camunda-license"
    existingSecretKey: "key"
Camunda 8 components without a valid license may display Non-Production License in the navigation bar and issue warnings in the logs. These warnings do not impact startup or functionality, except that Web Modeler is limited to five users.
Configuring Web Modeler, Console, and Connectors
Install Connectors
The Connector runtime is enabled by default. To start using connectors, install connector element templates. Learn more in our documentation for Web Modeler or Desktop Modeler.
Find all available configurable options in the official Camunda Helm values docs.
Disable Connectors
To disable Connectors, pass the connectors.enabled: false value when deploying Camunda Helm chart.
Polling authentication mode
Connectors use the Operate API to fetch process definitions containing inbound connectors. Depending on your Camunda architecture, choose one of the following values for the inbound.mode parameter:
disabled— Polling from Operate is disabled. The connector runtime will support only outbound interactions, such as HTTP REST calls.credentials— The connector runtime will attempt to authenticate to the Operate API using password-based basic HTTP authentication.oauth— (Recommended and enabled by default) The connector runtime will authenticate to the Operate API via an OAuth 2.0 provider. Camunda uses Keycloak as the default OAuth provider.
For more details, see the Connectors Helm values.
Install Web Modeler
Follow the steps below to install the Camunda Helm chart with Web Modeler enabled:
Configure Web Modeler
To set up Web Modeler, provide the following required configuration values. All available options are described in detail in the Helm chart’s values docs:
- Enable Web Modeler by setting
webModeler.enabled: true(disabled by default). - Configure your SMTP server by providing values under
webModeler.restapi.mail.- Web Modeler requires an SMTP server to send notification emails to users.
- Configure the database connection:
- Web Modeler requires a PostgreSQL database for persistent storage (other database systems are not currently supported).
- Option 1: Set
postgresql.enabled: trueto install a new PostgreSQL instance as part of the Helm release (using the Bitnami PostgreSQL Helm chart as a dependency). - Option 2: Set
postgresql.enabled: falseand configure a connection to an external PostgreSQL database (see the second example below).
We recommend specifying these values in a YAML file and passing it to the helm install command. A minimal configuration file would look like this:
webModeler:
  enabled: true
  restapi:
    mail:
      smtpHost: smtp.example.com
      smtpPort: 587
      smtpUser: user
      smtpPassword: secret
      # Email address to be displayed as sender of emails from Web Modeler
      fromAddress: no-reply@example.com
postgresql:
  enabled: true
If you don't want to install a new PostgreSQL instance with Helm, but connect Web Modeler to an existing external database, set postgresql.enabled: false and provide the values under webModeler.restapi.externalDatabase:
webModeler:
  restapi:
    externalDatabase:
      url: jdbc:postgresql://postgres.example.com:5432/modeler-db
      user: modeler-user
      password: secret
postgresql:
  # disables the PostgreSQL chart dependency
  enabled: false
For more details, check Web Modeler Helm values.
Install Console
Console Self-Managed is disabled by default in the Camunda 8 Helm chart.
To install Console, enable Console in the Helm chart with console.enabled: true. We recommend specifying these values in a YAML file that you pass to the helm install command:
console:
  enabled: true
For more details, check Console Helm values.
Console Self-Managed requires the Identity component to authenticate. Camunda Helm Chart installs Identity by default. When logging in to Console when using port-forward, port-forward the Keycloak service kubectl port-forward svc/<RELEASE-NAME>-keycloak 18080:80 or configure Identity with Ingress as described in the Ingress setup guide.
Installation troubleshooting
Check that each pod is running and ready. If one or more of your pods are still pending, it means it cannot be scheduled onto a node. Usually, this happens because there are insufficient resources that prevent it. Use the kubectl describe ... command to check on messages from the scheduler:
kubectl describe pods <POD_NAME>
If the output of the describe command was not helpful, tail the logs of these pods by running the following:
kubectl logs -f <POD_NAME>
Upgrading
For upgrading the Camunda Helm chart from one release to another, perform a Helm upgrade.
General notes
- Zeebe Gateway is deployed as a stateless service. We support Kubernetes startup and liveness probes for Zeebe.
- Zeebe broker nodes must be deployed as a StatefulSet to preserve cluster node identities. StatefulSets require persistent storage, which must be provisioned in advance. The type of persistent storage depends on your cloud provider.
- Docker pull limits apply when downloading Camunda 8 images from Docker Hub. To avoid disruptions, authenticate with Docker Hub, use a mirror registry, or follow our guide on installing in an air-gapped environment.