Deploy to Amazon ECS
This guide walks you through deploying the Camunda 8 Orchestration Cluster and Connectors on AWS Elastic Container Service (ECS) using Fargate and Aurora PostgreSQL, and verifying that all components are working.
If you are new to AWS ECS or Terraform, consider reviewing the AWS ECS documentation and Terraform documentation before proceeding with this guide.
Prerequisites
- AWS account – An AWS account to provision resources with permissions for ecs, iam, elasticloadbalancing, kms, logs, and rds services.
- For detailed permissions, refer to this example policy.
- Terraform – Infrastructure as code tool (v1.7 or later). Install Terraform.
- AWS CLI – Command-line tool to manage AWS resources, used for
local-execto trigger the initial Aurora PostgreSQL user seeding. Install AWS CLI.
For the exact tool versions used during testing, refer to the repository's .tool-versions file.
Considerations
This guide is based on an experimental release. Content and results may change before the final 8.9.0 release.
Running this guide incurs costs on your AWS account, primarily for ECS and Aurora. Use the AWS pricing calculator to estimate costs for your region.
If you want a simpler setup, consider using Camunda 8 SaaS.
- Unlike our other guides, which usually separate infrastructure setup from the deployment of Camunda 8, this is not the case with ECS. Since the infrastructure is largely managed by AWS, deploying Camunda 8 and provisioning the required AWS resources happens in a single step.
- This guide focuses on AWS ECS with Fargate but can work with managed instances for more predictable performance. You can find more information about how to migrate from Fargate to managed instances from the AWS migration guide.
- This guide relies on a shared multi-AZ replicated EFS network disk.
- Cost and performance may differ from a related Kubernetes setup with block storage.
- The EFS volume is shared among all brokers to support the native ECS Service capabilities.
- AWS does not support block storage options in combination with ECS Services and Fargate. For a detailed overview, have a look at the AWS documentation.
- Scaling is a manual process as it requires invoking the cluster scaling API for joining and removing a Zeebe broker. Autoscaling may not have effects as the brokers have to be explicitly joined into the Zeebe cluster or when removed result in partitions or data becoming inaccessible.
- A node-id provider is integrated into Zeebe that assigns an available node-id based on Zeebe cluster information, instead of relying on a statically-configured node-id.
- This guide focuses on Aurora PostgreSQL for the secondary datastorage as it is a newly supported offering by Camunda 8 and potentially more familiar for customers.
- You may still use Elasticsearch or OpenSearch but need to adjust the required configuration. More information about the configuration can be found in our documentation.
- Examples for how to deploy AWS OpenSearch can be found in other existing reference architectures for AWS.
Reference architectures and examples provided in this guide are not turnkey modules. Camunda recommends cloning the repository and modifying it locally.
You are responsible for operating and maintaining the infrastructure. Camunda updates the reference architecture over time, and changes may not be backward compatible. You can use these updates to upgrade your customized codebase as needed.
Outcome
The result is a fully functioning Camunda Orchestration Cluster deployed in a high-availability setup using AWS ECS with Fargate and a managed Aurora PostgreSQL instance using IAM authentication. All ECS tasks share a single EFS volume dedicated to Camunda.
Architecture
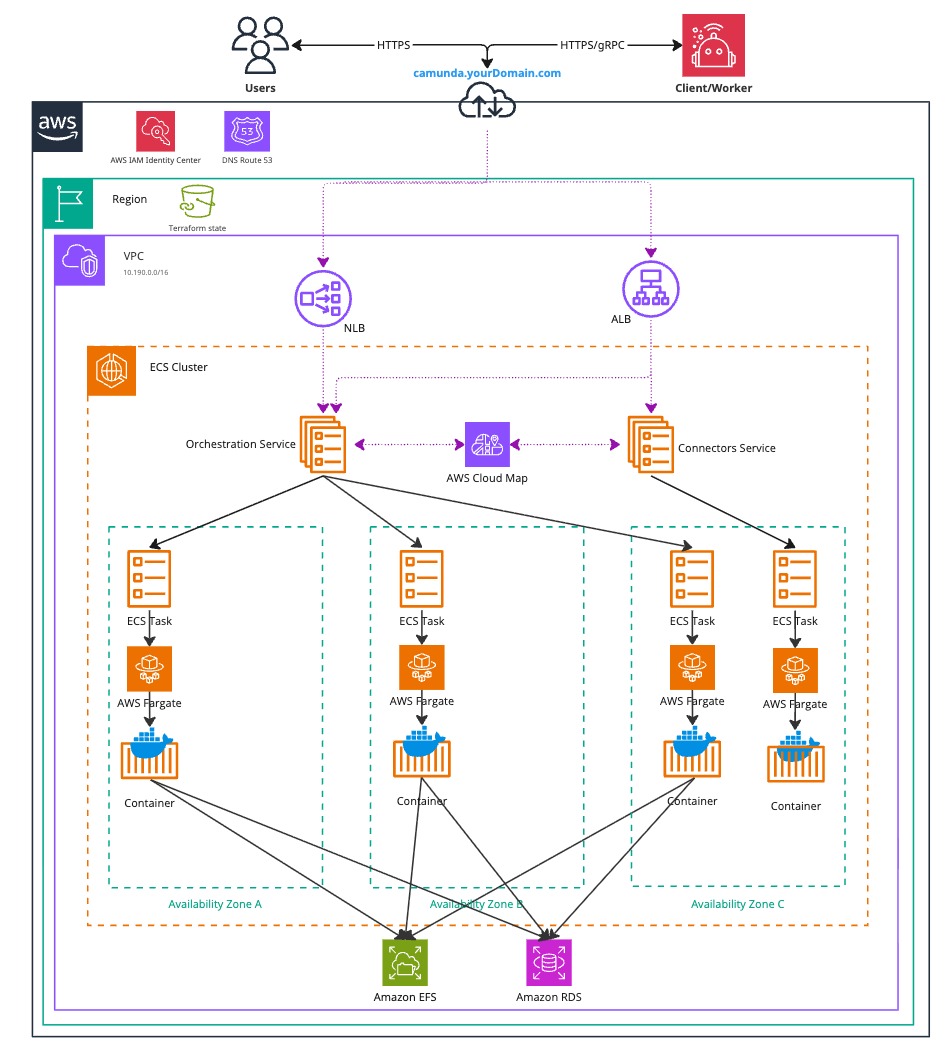
The architecture outlined below describes a standard Zeebe three-node deployment, distributed across three availability zones within a single AWS region. It includes a managed Aurora PostgreSQL instance deployed under the same conditions. This approach ensures high availability and redundancy in case of a zone failure.
Infrastructure diagram for the Orchestration Cluster ECS architecture (click the image to view the PDF version)
After completing this guide, you will have:
- A Virtual Private Cloud (VPC), which is a logically isolated virtual network.
- For simplification the private and public were not visualized in the diagram above.
- A Private Subnet, which does not have direct internet access.
- Elastic Container Service (ECS) Cluster
- ECS Services for the Orchestration Cluster and Connectors
- These spawn ECS tasks running on Fargate
- Elastic File System (EFS) as primary datastore for the Zeebe cluster
- Aurora PostgreSQL as secondary datastore
- ECS Services for the Orchestration Cluster and Connectors
- A Public Subnet, which has internet access via an Internet Gateway.
- (Optional) An Application Load Balancer (ALB) to expose web interfaces such as Operate, Tasklist, Connectors, and the Orchestration Cluster REST API. This uses sticky sessions, as requests are otherwise distributed round-robin across ECS instances.
- (Optional) A Network Load Balancer (NLB) to expose the gRPC endpoint of the Zeebe Gateway, if external applications need to connect.
- Security Groups to control network traffic to and from the ECS instances.
- An Internet Gateway to route traffic between the VPC and the internet.
- An S3 bucket used by the Orchestration Cluster’s ECS-specific node-id provider.
- A versioning-enabled S3 bucket for backups.
- Use a separate bucket for backups. The node-id bucket has versioning disabled because frequent metadata changes would incur additional cost without any benefit.
- AWS Secrets Manager for application credentials and optional container registry credentials.
- AWS CloudWatch for logs.
- ECS Service Connect to connect ECS services directly with each other.
- IAM authentication to connect the Orchestration Cluster with the Aurora PostgreSQL cluster.
Both subnet types are distributed across three availability zones in a single AWS region, supporting a high-availability architecture.
You can also scale this setup to a single ECS task. In that case, a zone failure makes the environment unavailable.
Configure AWS and initialize Terraform
We do not recommend using the following Terraform-based infrastructure as a module, since we cannot guarantee compatibility.
Instead, we suggest reusing or extending components of the Terraform example to ensure alignment with your environment.
Obtain a copy of the reference architecture
Start by downloading a copy of the reference architecture from the GitHub repository. This content will be used throughout the rest of the guide. The reference architectures are versioned according to Camunda releases (e.g., stable/8.x).
The reference architecture repository allows you to reuse and extend the provided Terraform examples. This flexible implementation avoids the constraints of relying on third-party-maintained Terraform modules:
loading...
With the reference architecture in place, you can proceed with the remaining steps in this documentation. Make sure you're in the correct directory before continuing with the instructions.
Terraform prerequisites
To manage Camunda 8 infrastructure on AWS using Terraform, you need to configure Terraform's backend to store the state file remotely in an S3 bucket. This provides secure, persistent primary storage for your infrastructure.
Advanced users may choose to configure a different backend. The setup described here is a recommended starting point for new users.
Set up AWS authentication
The AWS Terraform provider is required to provision resources in AWS. Before using the provider, you must authenticate it with your AWS credentials.
Any user who creates AWS resources retains administrative access to them. For better control and security, it is recommended to create a dedicated AWS IAM user specifically for Terraform. This ensures the resources are properly managed and owned by a single identity.
You can customize the region and authentication settings as needed. Terraform supports multiple authentication methods, including:
- For development or testing, you can use the AWS CLI. If your AWS CLI is already configured, Terraform will automatically detect and use those credentials.
To configure the AWS CLI:
aws configure
Enter your AWS_ACCESS_KEY_ID, AWS_SECRET_ACCESS_KEY, region, and output format. These can be retrieved from the AWS Console.
- For production environments, it is recommended to use a dedicated IAM user. Create access keys for that user via the AWS console, and export them as environment variables:
AWS_ACCESS_KEY_IDandAWS_SECRET_ACCESS_KEY.
Create an S3 bucket for Terraform state management
Before initializing Terraform, you must create an S3 bucket to store the state file. This is essential for collaborative work and helps prevent issues such as state file corruption.
Begin by setting your preferred AWS region as an environment variable to avoid repeating it in every command:
export AWS_REGION=<your-region>
Replace <your-region> with your chosen AWS region (e.g., eu-central-1).
Next, follow these steps to create an S3 bucket with versioning enabled:
-
Open your terminal and ensure that the AWS CLI is installed and properly configured.
-
Run the following command to create an S3 bucket for storing your Terraform state. Be sure to choose a unique bucket name, and ensure that the
AWS_REGIONenvironment variable is already set:aws/common/procedure/s3-bucket/s3-bucket-creation.shloading... -
Enable versioning on the S3 bucket to track changes and protect the state file from accidental deletions or overwrites:
aws/common/procedure/s3-bucket/s3-bucket-versioning.shloading... -
Secure the bucket by blocking public access:
aws/common/procedure/s3-bucket/s3-bucket-private.shloading... -
Verify versioning is enabled on the bucket:
aws/common/procedure/s3-bucket/s3-bucket-verify.shloading...
The S3 bucket is now ready to securely store your Terraform state files, with versioning enabled for added protection.
Initialize Terraform
Once authentication is configured, you can initialize your Terraform project. Earlier, you created a dedicated S3 bucket (S3_TF_BUCKET_NAME) for storing the state file. In this step, Terraform will use that bucket along with a specific key to manage your infrastructure state.
Initialize the backend and download the required provider plugins:
Make sure you are in the terraform/cluster subfolder: camunda-deployment-references/aws/containers/ecs-single-region-fargate/terraform/cluster.
loading...
Terraform will now use the S3 bucket to manage the state file, ensuring remote and persistent storage.
Terraform setup
The root workspace houses the overall implementation to keep things configurable and interchangeable as needed.
While each Camunda component is kept as a separate module to abstract the need of each component as it's required with their base setup.
If wanting to deploy multiple Camunda 8 setups, it may make sense to abstract the root workspace to a common module as well to allow easier scaling.
If not otherwise indicated, the .tf file is corresponding to the root workspace path.
Elastic Container Service
ecs.tf contains the ECS cluster, which is just a logical component to group ECS resources.
../../modules/ecs/fargate/orchestration-cluster is the main component Orchestration Cluster of Camunda and contains the definitions for:
-
ECS Service and task definition
- Defines the base setup for the Orchestration Cluster, including the node ID provider, EFS configuration, and initial cluster endpoints.
- Automatically sets the Zeebe cluster size based on the task count.
- Resolves initial contact points using DNS with multiple A records instead of requiring explicit Zeebe broker addresses.
-
Task-specific IAM role
- Grants access to AWS services required by this component, such as the S3 bucket and Aurora PostgreSQL.
-
S3 bucket
- Used by the ECS-specific node ID provider.
-
CloudWatch log group
- Used for Orchestration Cluster logs.
- Can be shared with other Camunda components that have a one-to-one relationship with the Orchestration Cluster, such as Connectors.
-
Networking configuration
- Integrates with ECS Service Connect and Amazon Route 53 to enable access from within the VPC, including from resources outside the ECS cluster (for example, EC2 instances or Kubernetes clusters).
-
Load balancer configuration
- Adds listener rules to a shared load balancer for the Orchestration Cluster and Connectors.
-
EFS file system
The base terraform documentation for this module can be found alongside the repository.
../../modules/ecs/fargate/connectors is a secondary component Connectors and contains the definitions for:
- ECS Service and Task definition
- Task specific IAM role to allow access to AWS services isolated to this component
- Load Balancer related configurations to add listener rules to a shared Load Balancer between Orchestration Cluster and Connectors
The base terraform documentation for this module can be found alongside the repository.
camunda.tf contains the module invocations with an example base configuration for the Orchestration Cluster and Connectors:
- Aurora PostgreSQL configuration with the AWS JDBC Wrapper that comes as part of the Camunda distribution
- Basic authentication Identity setup
- Admin user with random password
- Connectors user with random password configured and pre-configured for Connectors to consume to connect to the Orchestration Cluster
In camunda.tf you can pass in any configuration adjustment required for the component or increase the resources. A few configuration options as mentioned above are kept as part of the modules to ensure the user can't interfere with the base setup. If you need to adjust those, then you have to adjust those in your copy of the modules.
Aurora PostgreSQL
If you do not want to use this module, you can skip this section. However, you will need to adjust the remaining steps to remove any references to it.
If you choose not to use this module, you must provide your own PostgreSQL, Elasticsearch or OpenSearch instance and make required config adjustments.
Additionally, be sure to delete the postgres.tf and postgres_seed.tf file in your reference copy—otherwise, the resources defined in it will still be created. Additionally, remove the references for the IAM access in iam.tf following the RDS IAM Auth Support section.
postgres.tf provisions an Aurora PostgreSQL cluster with a pre-created camunda database and admin credentials saved in the AWS Secrets Manager. This Aurora PostgreSQL cluster is used as secondary storage for the Orchestration Cluster.
postgres_seed.tf provisions a temporary ECS task to pre-seed the database for IAM authentication to work. The Aurora PostgreSQL cluster is not easily accessible from the outside as we don't expose it, therefore a workaround is required to do the initial user creation for the IAM authentication to work instead of using hard-coded username/password combinations.
If you're fine with username/password, you can remove the postgres_seed.tf and reuse the admin user that was created on creation to configure the Orchestration Cluster to consume said user.
Miscellaneous Resources
registry-auth.tf contains the basics to create a secret via the AWS Secrets Manager for any kind of registry to access the Camunda images or bypass rate limitations.
lb.tf contains the creation of the main Network Load Balancer (NLB) and the Application Load Balancer (ALB).
iam.tf contains various IAM roles and policies.
secrets.tf contains the creation of random passwords and storage in AWS Secrets Manager.
s3.tf contains a bucket for backup purposes with versioning and encryption enabled. Access is handled through IAM role policies.
Advanced Topics
Camunda components configuration
The Terraform implementation does not abstract any configuration and anything you need to configure for the Camunda components can be found within their own documentation.
Camunda components can be configured for example via environment variables or an application YAML.
Environment Variables
The base configuration is done via environment variables and defined directly as is in the invocation of the module.
An alternative approach, still with environment variables, could be to load them from an external file.
Example:
KEY=VALUE
KEY2=VALUE2
KEY3=${template}
The file orchestration-cluster-env could then be loaded in Terraform via:
locals {
  # Combine with templatefile to replace dynamic values derived from Terraform
  env_lines = split("\n", templatefile("orchestration-cluster-env", {
    template = "SOME_TF_VALUE"
  }))

  # Splits KEY=VALUE into expected JSON
  env_kv_pairs = [
    for line in local.env_lines : {
      name  = trim(split("=", line)[0], " ")
      value = trim(join("=", slice(split("=", line), 1, length(split("=", line)))), " ")
    }
    if length(split("=", line)) > 1  # Filter out lines without '='
  ]
}
This can then be passed to the module invocation
environment_variables = local.env_kv_pairs # or mixed with the concat function
Application YAML
- This can either be baked into a custom image permanently by you
- Pull application YAML on startup via init container from external store or integrate in Terraform
Example:
init_container_enabled = true
init_container_image   = "public.ecr.aws/amazonlinux/amazonlinux:minimal"
init_container_command = ["sh", "-c", "curl -fsSL https://example.com/additional-properties.yaml -o /config/additional-properties.yaml"]
Add this as part of your module environment usages to let Spring know to load the additional file.
{
  name  = "SPRING_CONFIG_IMPORT"
  value = "file:./config/additional-properties.yaml"
}
/config is a shared ephemeral volume between the init container and the running container.
Terraform Configuration
The base terraform documentation for the Orchestration can be found alongside the repository as well as for Connectors.
Some common topics to potentially change:
Resources
# both modules

task_cpu              = 4096
task_cpu_architecture = "X86_64"
task_memory           = 8192
The EFS file system uses the elastic throughput mode by default. This mode automatically scales for most workloads. If you need a fixed throughput configuration, adjust the efs_throughput_mode and efs_provisioned_throughput_in_mibps variables.
Example:
# Orchestration Cluster

efs_throughput_mode                    = "provisioned"
efs_provisioned_throughput_in_mibps    = 50
Camunda
Image
# both modules

image = "camunda/camunda:VERSION" # "camunda/connectors-bundle:VERSION"
You could supply your custom registry and version this way like:
image = "ghcr.io/NAMESPACE/IMAGE_NAME:VERSION"
Sizing
# both modules

task_desired_count = X
# in case of Orchestration Cluster automatically changes the `camunda.cluster.size`
Wait for ready
This flag ensures that Terraform waits until the ECS service is successfully deployed.
It is useful when other components, such as Connectors, depend on the Orchestration Cluster, because it prevents them from being deployed before the cluster is ready.
If you disable this flag, Terraform deploys all resources at once without waiting for service readiness.
# both modules
wait_for_steady_state = true
Aurora PostgreSQL initial user seeding
When wanting to use IAM authentication to simplify the authentication between Orchestration Cluster and Aurora PostgreSQL cluster then an initial seeding of the database is required to have a passwordless user with the rds_iam role assigned. More information about IAM authentication with Aurora can be found in the AWS documentation.
Terraform itself can't do this initial seeding as the Aurora PostgreSQL is not publicly exposed, so a workaround is needed. In our reference architecture to keep things simple and working ideally immediately, a local execution was used that triggers a one time seeding job to do the required steps as the ECS has access to Aurora PostgreSQL cluster.
As previously mentioned, if you don't want to do this local execution, you can delete the postgres_seed.tf and remove the depends_on in camunda.tf.
Alternatives are for example:
- Externally supplied PostgreSQL
- Rely on username / password of e.g. admin user
- Manual seeding via an EC2 instance or ECS task in the same VPC or a connected VPN
- Temporarily exposing the Aurora PostgreSQL cluster (not recommended)
- AWS Lambda function that does the seeding
- AWS Step function that does the seeding
It was implemented as a local exec with an ECS task since we wanted to provide a fully working reference end-to-end while still relying on something like IAM authentication.
Rolling deployments
The Orchestration Cluster is stateful and overprovisioning will not help the deployment to reach a ready state quicker as we're limited by the Zeebe node-ids and brokers only becoming ready when successfully joining a cluster. Therefore, the Orchestration Cluster does a deployment of maximum 100% of tasks and minimum 66% to ensure quorum is kept. If using smaller task sizes, you may have to consider using service_force_new_deployment = true to force a new deployment as otherwise the minimum and maximum task size will block a successful update.
For the Connectors task, it's kept at a maximum of 200% and minimum of 50% as the application is stateless and can therefore scale above the initial target during upgrades.
Execution
We strongly recommend managing sensitive information using a secure secrets management tool such as HashiCorp Vault. For guidance on injecting secrets into Terraform via Vault, refer to the Terraform Vault Secrets Injection Guide.
Due to the postgres_seed.tf it is required that the machine executing it has the AWS CLI installed and configured to be able to start and wait for the seeding task to have finished.
If that is not wanted or can't be done then please either execute it as two steps with manual seeding, fallback to username/password or supply a pre-configured secondary storage as previously mentioned.
-
Open a terminal in the reference directory containing
config.tfand the other.tffiles. -
Perform a final initialization to apply any changes made throughout this guide:
aws/common/procedure/s3-bucket/s3-bucket-tf-init.shloading... -
Plan the configuration files:
terraform plan -out cluster.plan # describe what will be created -
After reviewing the plan, you can confirm and apply the changes:
terraform apply cluster.plan # apply the creation
Terraform will now provision the Amazon ECS resources and the Aurora PostgreSQL cluster with all necessary configurations. This process may take approximately 20–30 minutes to complete.
The Terraform flow is as follows:
- Creation of the VPC and related resources, among that IAM roles
- Creation of the Aurora Postgres Cluster within the VPC
- Creation of the temporary Aurora Postgres seeding task and wait for it to finish
- Creation of the Orchestration Cluster and wait for it to be ready
- Creation of the Connectors and wait for it to be ready
Verify connectivity to Camunda 8
Using Terraform, you can obtain the HTTP endpoint of the Application Load Balancer and interact with Camunda through the Orchestration Cluster REST API.
To keep dependencies minimal and non-blocking for a quick start, this reference architecture omits a custom domain and TLS configuration.
You can easily add TLS by attaching an AWS Certificate Manager (ACM) certificate to the Application Load Balancer (ALB). For details, see the AWS documentation on creating an HTTPS listener.
Information on configuring a custom domain and understanding the ALB DNS name is available in the Application Load Balancer documentation.
Without these additions, information is transmitted in plaintext and is therefore insecure.
- Navigate to the Terraform folder:
cd camunda-deployment-references-main/aws/containers/ecs-single-region-fargate/terraform
- Retrieve the Application Load Balancer output:
terraform output -raw alb_endpoint
The ALB exposes both the Orchestration and Connectors through the same port and uses listener rules with weights to determine the path they're on.
- ALB:80
/*routes to the Orchestration Cluster UI/REST API/connectors*routes to the Connectors
- ALB:9600 (optional - not recommended to be exposed publicly)
/*routes to the Orchestration Cluster- Connectors has the management port with the web server combined by default
- NLB:26500 (TCP)
- Exposes the Orchestration Cluster - Zeebe Gateway with gRPC
-
Access the URL of
alb_endpointwhich should present you a login screen.The admin user name as pre-configured in
camunda.tfisadminand the password is randomly generated and can be retrieved via:terraform output -raw admin_user_password -
Use the Orchestration Cluster REST API to communicate with Camunda:
Follow the example in the Orchestration Cluster REST API documentation to authenticate and retrieve the cluster topology.
Troubleshooting
Logs
Logs are by default exported to CloudWatch unless configured otherwise by you. Those are both visible in the CloudWatch dashboard and the ECS Service alongside each task.
Accessing task or management API
ECS tasks are not easily accessible without workarounds, some options are the following:
- EC2 / ECS debug instance / task within the same VPC to try to ping and use the management API
- AWS VPN connected to the VPC
- Lambda functions
- Step functions
- Temporarily exposing the management API
- Temporarily set
task_enable_execute_commandtotrueand redeploy to allow accessing the running container
aws ecs execute-command \
  --cluster $ECS_CLUSTER \
  --task $ECS_TASK_ID \
  --container orchestration-cluster \
  --command "/bin/sh" \
  --interactive
You can find more information about AWS ECS Exec within the AWS documentation.
For general troubleshooting assistance, consult the operational guides troubleshooting documentation.
Operations
Backup and restore
The general backup and restore procedure applies.
The backup process, itself, doesn't require changes.
Restoring, however, introduces additional complexity because each broker's data directory (persistent volume) must be restored in a coordinated manner. To support this, an init container is introduced as part of the Orchestration Cluster, responsible for restoring the data directory for the broker running in that task. This mechanism corresponds to the step of restoring the Zeebe Cluster.
This approach is implemented in the example module. Set the restore_enabled parameter to true to enable it. You can optionally provide the restore_backup_id parameter to target a specific backup (see restore options when using RDBMS).
On startup, the init container leverages the node-id provider to determine its broker ID in alignment with the other tasks. It restores the partitions associated with that broker, then blocks execution until all brokers have completed their restore operations. Afterward, the init container exits, allowing the Orchestration Cluster container to start.
You must configure the init container and the Orchestration Cluster container identically. If you use environment variables, this requirement is automatically satisfied. If configuration is distributed through other mechanisms, those must also be explicitly applied to the init container.
As long as the restore_enabled parameter remains set to true, the init container remains part of the task definition. After the backup has been successfully restored, subsequent executions will effectively be no-ops until the parameter is removed.
Camunda recommends restoring to a fresh cluster rather than reusing an existing one. A newly created cluster already has an empty S3 bucket and EFS volume, so no additional cleanup is needed. If you choose to restore into an existing cluster instead, you must manually ensure the S3 bucket configured for the node ID provider is empty and the EFS volume is fully cleared before starting the restore.
Next steps
After setting up your cluster, many users typically do the following:
- Connect to an identity provider – integrate with an external identity system for authentication.
- Add TLS and configure a custom domain for the Application Load Balancer (ALB).