Test your process
Test mode is a Zeebe-powered way within Camunda Hub to validate a process at any stage of development. Select any environment assigned to your workspace, for example a development, test, stage, or production environment, and choose which version to test against. You can view, run, and modify test cases without deploying; deployment is only needed when there are changes made to the diagram. Developers can debug their process logic, testers can manually test the process, and process owners can demo to stakeholders, all within Test mode.
Opening the Test tab
To use Test mode, open a BPMN diagram and click the Test tab. Read the limitations and availability section if this tab is missing.
Select any environment assigned to your workspace as your test target. Each environment shows its tags, such as dev, test, stage, or prod. In Self-Managed, the environments come from the clusters defined in your Camunda Hub configuration; the Camunda 8 Helm and Docker Compose distributions provide one environment, backed by a cluster, by default.
Test mode executes real process logic against the selected environment, including connectors, messages, and other external actions. If you target a production environment, this can affect live data and external systems. Camunda Hub warns you with This is a production environment when you select an environment tagged prod.
Opening the Test tab doesn't deploy your process automatically. Use the Set up test run panel to select an environment, deploy, and configure a test case. See get started with Test mode for the full flow.
The Test action bar shows the name of the selected environment, its tags, and its Logical Tenant. Click it to choose a different environment without leaving Test mode. The newly selected environment becomes the deployment and execution target. If no environment is selected, the action bar shows No environment selected.
If no environment is assigned to your workspace, Test mode tells you that an environment must be assigned to the workspace. Ask an organization admin to assign an environment.
In SaaS, Test mode uses connector secrets from your selected environment. Connector secrets are not currently supported in Self-Managed.
Authorizations
If authorizations are enabled on the environment where you will run a test, the following permissions are required for each action:
| Resource Type | Permission | Allowed action |
|---|---|---|
| Resource | CREATE | Deploy a process |
| Process definition | CREATE_PROCESS_INSTANCE | Start a process instance |
| Process definition | READ_PROCESS_INSTANCE | View process instance(s) |
| Process definition | READ_USER_TASK | Get information about a user task |
| Process definition | UPDATE_USER_TASK | Complete a user task |
| Process definition | UPDATE_PROCESS_INSTANCE | Complete a service task, Throw error from a service task, Apply modifications, Set variables, Resolve incidents |
| Decision definition | READ_DECISION_DEFINITION, READ_DECISION_INSTANCE | View decision instance in Operate (SaaS only) |
| Message | CREATE | Publish a message |
Limitations
- Fine-grained authorizations are not supported. If the Resource ID is not * when defining authorizations, the user will not have access to any resources.
Get started with Test mode
When you open the Test tab for the first time in a process, the Set up test run panel guides you through three steps:
- Choose where to run
- Choose resources to deploy
- Configure test case
1. Choose where to run
Click Select environment, and select a target environment. If the environment has more than one Logical Tenant, select one. Once the environment is healthy, it advances to the next step.
2. Choose resources to deploy
- All resources: Deploys the whole project, including dependencies like called processes or DMN files.
- Only this resource: Deploys only the open file.
When testing a snapshot version, Only this resource is not allowed.
Click Deploy. Once the deploy succeeds, it automatically progresses to the next step.
3. Configure test case
Start and end elements for the segment are auto-selected. Some processes have no selectable end element — for example, when the process starts with a message or signal event, or has no end event — in which case the test run completes naturally. Click the edit icon to pick a different element.
Start boundary
The start boundary defaults to the process start event. To change it:
- In the Configure test case step, click the start row.
- Search for an element by name, or click an activatable element directly on the canvas. The selected element is highlighted with a Start label on the diagram.
Elements before the start boundary are not activated and do not appear in the instance history.
The same element type restrictions apply as for Add token modifications. Clicking a non-activatable element in picking mode has no effect.
Publish message and Broadcast signal elements don't support segment boundaries. If you select either as the start boundary, you can't select an end boundary, and the process runs until it reaches the end node naturally reached from that selected start event.
End boundary
The end boundary is optional and defaults to the first end event. Click Start without changing it to accept the default, or change it:
- In the Configure test case step, click the end row.
- Search for an element by name, or click an activatable element directly on the canvas. The selected element is highlighted with an End label on the diagram.
- To clear the end boundary, click the x icon on the End label on the canvas, or search for the same element again and deselect it from the results.
When an end boundary is set, the process instance terminates after that element completes. Elements after it are not activated and do not appear in the instance history.
Canvas click interaction
Once both boundaries are set, clicking the canvas resets the start boundary and clears the end boundary. To change only one boundary, click its row in the panel first, then click the new element on the canvas.
Click the selected start event to configure how the process should start — the panel shows various options depending on its Start event type:
- None start event: A JSON editor pre-filled with example data from the BPMN definition. Click Start to begin the process with the current variables, or Start with Form if the start event has a linked form.
- Message start event: A Message name field pre-filled from the BPMN definition. Click the icon next to the field to open a Configure Message modal where you can set the correlation key, TTL, and message ID.
- Signal start event: A Signal name dropdown pre-filled with the signal from the BPMN definition.
To prefill example data, define it in the Example data section of the start event in Implement mode. See data handling for details.
Test mode will only consider the first executable process ID in the BPMN file.
Run a test case
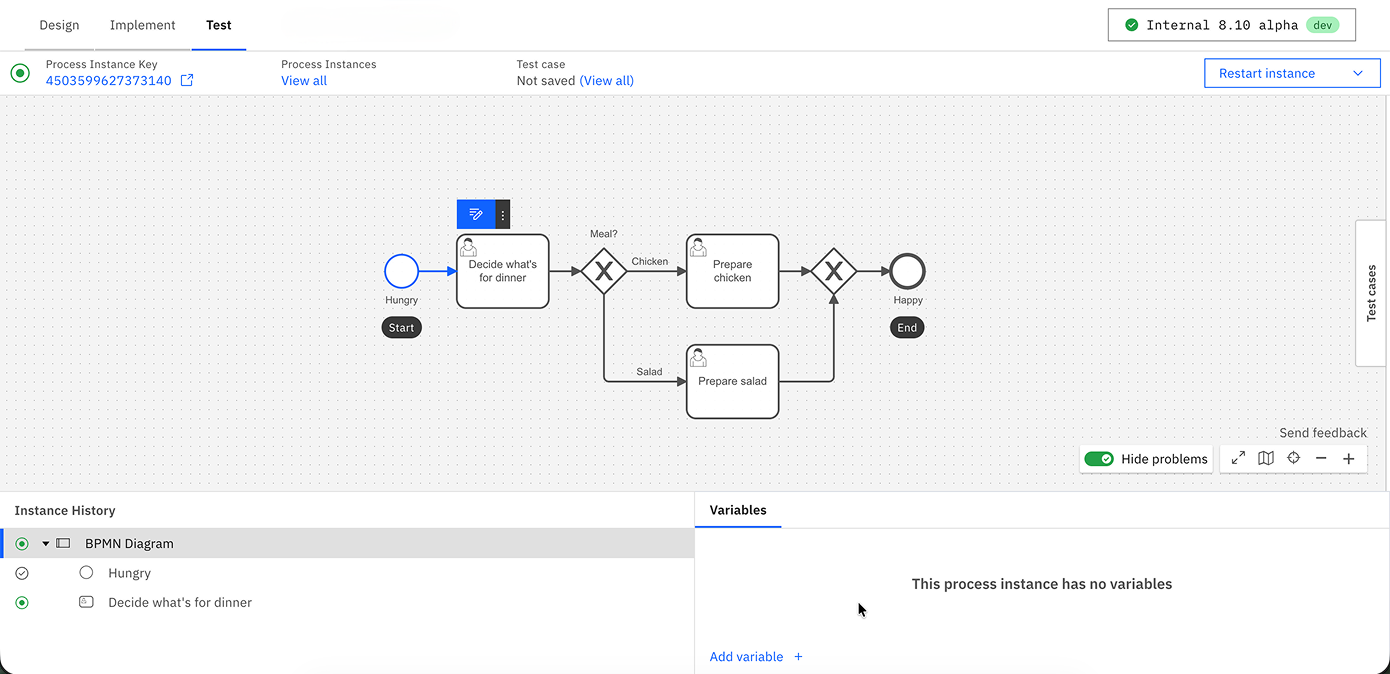
Click the Start test button to start the test.
If you defined a test segment with an end boundary, the instance terminates automatically after the end element completes — elements after it are not activated and do not appear in the instance history.
The Instance History panel tracks the path taken throughout the diagram.
The Variables panel tracks the data collected. Global variables are shown by default. To view local variables, select the corresponding task or event. Variables can be edited or added here, and Test mode supports JSON format to represent complex data.
Test mode executes all logic of the process and its linked files, such as FEEL, forms, DMN tables, and outbound connectors.
Actions in Test mode can be initiated through Operate, Tasklist, or external APIs. For example, you can complete a user task via Tasklist, finish a service task using an external job worker, or cancel/modify your instance through Operate, with all changes reflected in Test mode.
In SaaS, view your process instance in Operate by selecting the Process Instance Key in the header.
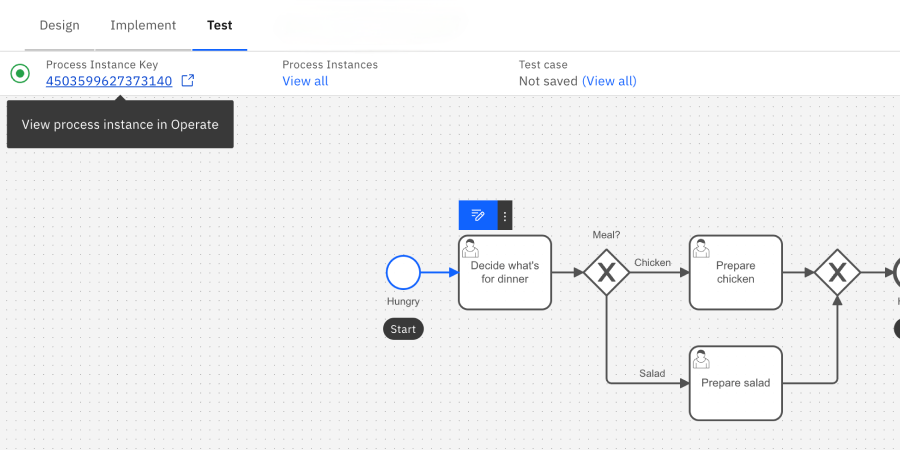
You have a few options to mock an external system:
- In Implement mode, hard-code an example payload in the task or event's Example data section in the properties panel on the right side of the screen.
- When completing a task or event, use the secondary action to complete it with variables.
- When filling forms or setting variables from Test mode, you can also save the variables to the BPMN file as example data to reuse them in future sessions.
- Use service task placeholders instead of connectors
Test mode automatically uses example data from the BPMN file for many events and task types. If you want to use different data, you can override the example data by opening the secondary action menu on an element. The new data set will take precedent over the example data from the BPMN file for future Test mode sessions.
Incidents are raised in Test mode just like in Operate. Use the variables and incident messages to debug the process instance.
Re-test a process
To re-test a process, rewind to an earlier element by clicking on the Rewind button on a previously completed element.
You can also return to the definition view by clicking View all on the top banner, or start a new process instance by clicking on the Restart process button on the start event.
Rewind a process
After completing part of your process, you can rewind to a previous element to test a different path. Test mode will start a new instance and retest your actions up to, but not including, the selected previous task.
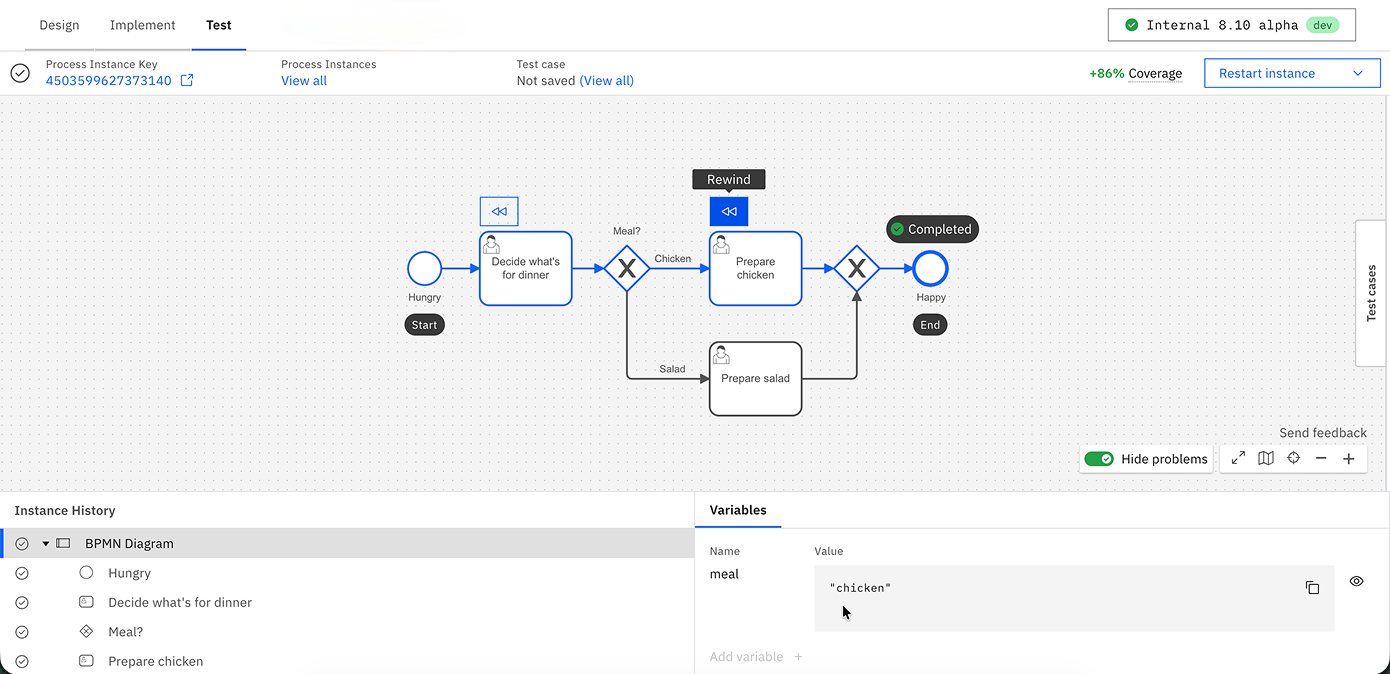
Test mode's rewind operation currently does not support the following elements:
- Call activities
- Timer events
Additional limitations
- If you completed an unsupported element before rewinding, you will rewind farther than expected.
- Test mode rewinds to an element, not to an element instance. For example, if you wanted to rewind your process to a sequential multi-instance service task which ran five times, it will rewind your process to the first instance of that service task.
- Test mode rewinds processes by initiating a new instance and executing each element. However, if any element behaves differently from the previous execution, such as a connector returning a different result, the rewind may fail.
Test cases
Use test cases to quickly rerun processes while tracking test coverage.
For example, you can validate your process by creating and rerunning test cases for different paths to check the process works as expected after any diagram changes are made. Test cases allow you to retest and confirm that a process completes correctly with the predefined actions and variables.
Although test cases are valuable for rapid validation during development, Camunda best practices recommend using specialized test libraries in your CI/CD pipeline for comprehensive testing.
Test cases are stored in test files. You can view and edit these files directly in Camunda Hub or in your Git repository using Git sync.
Test mode will use the test file linked to the first executable process ID of the BPMN diagram.
If multiple test files are linked to the same process ID, Test mode uses the one with the earliest name alphabetically. If more than one shares that name, Test mode uses the one most recently updated.
Save a test case
To save a test case:
-
Execute a path in your process.
-
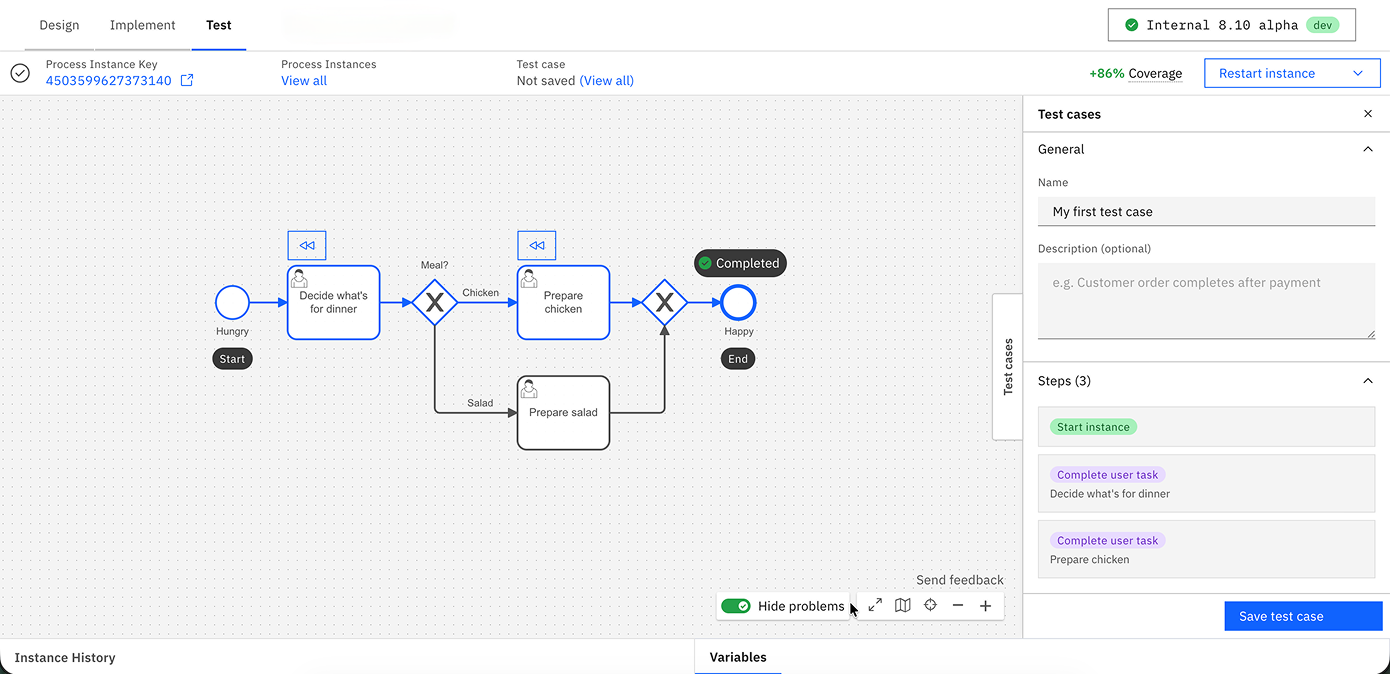
In the Test cases panel enter the following details:
Field Description Name A name for the test case. Description (optional) A description of what the test case validates, for example, "Customer order completes after payment." -
Review the Steps the test case will re-run, such as Start instance. (Optional) Click Add assertion to add an assertion to a step. See Add assertions.
-
Click Save test case.
-
A new test file will be saved in the same Camunda Hub folder as the process.
Add assertions
A test case that only executes its instructions can still pass even if it produces incorrect output or follows the wrong path. Use assertions to verify what actually happened, not just whether the test case finished.
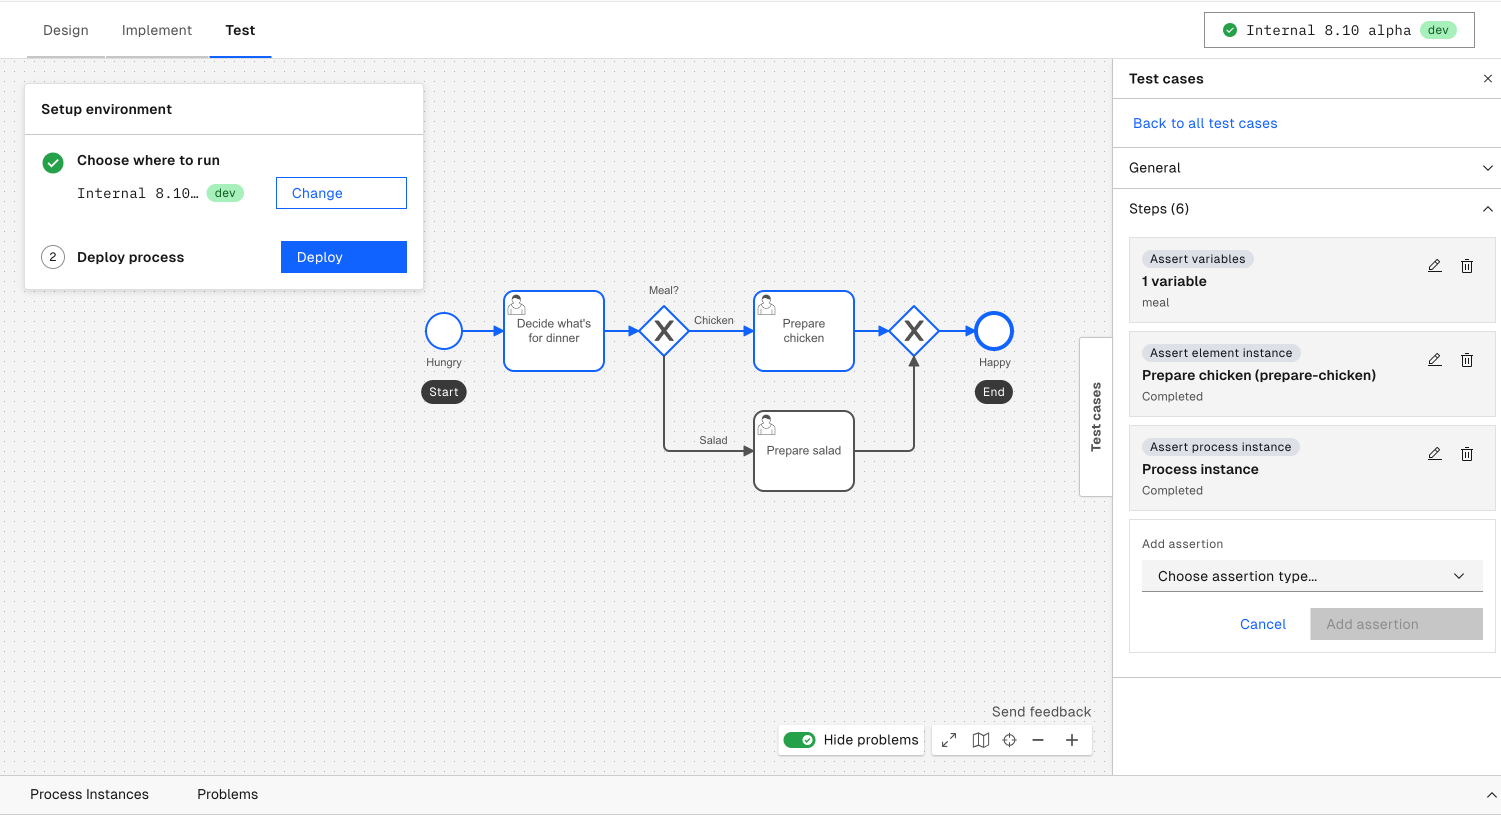
Variable assertions
Check that a process or local variable has an expected value.
- Click Add assertion > Variable.
- Select a variable name from the dropdown list, populated from the variables observed in the most recent test run.
- Enter the expected value for that variable.
Element assertions
Check that a specific element reached an expected state.
- Click Add assertion > Element.
- Select the element on the canvas, or search for it by name in the list.
- Choose the expected state from the dropdown list (for example, completed, active, or terminated).
Process instance assertions
Check the overall state of the process instance.
- Click Add assertion > Process instance.
- Choose the process instance state from the dropdown list (for example, created, active, completed, or terminated).
Update or remove an assertion
Open a saved test case's detail view in the side panel, then edit or delete any existing assertion the same way you added it. After you save a test case for the first time, assertion changes save automatically—no extra save step is needed.
Test mode's variable, path, and process instance assertions use the same instructions as test files: ASSERT_VARIABLES, ASSERT_ELEMENT_INSTANCE, and ASSERT_PROCESS_INSTANCE. See the full instruction reference for the underlying schema.
Edit a test case
Open a test case's detail view in the side panel to edit its name, description, and instructions inline.
Review test coverage
Test coverage is calculated as the percentage of flow nodes in your process that are covered, including all elements, events, and gateways. For example, the coverage is 80% if eight out of ten flow nodes are covered.
- On the process definition page, covered paths are highlighted in blue. Click on individual test cases to view their specific coverage.
- Once a process instance is completed, the process instance header shows how much your process test coverage would increase if the path was saved as a test case.
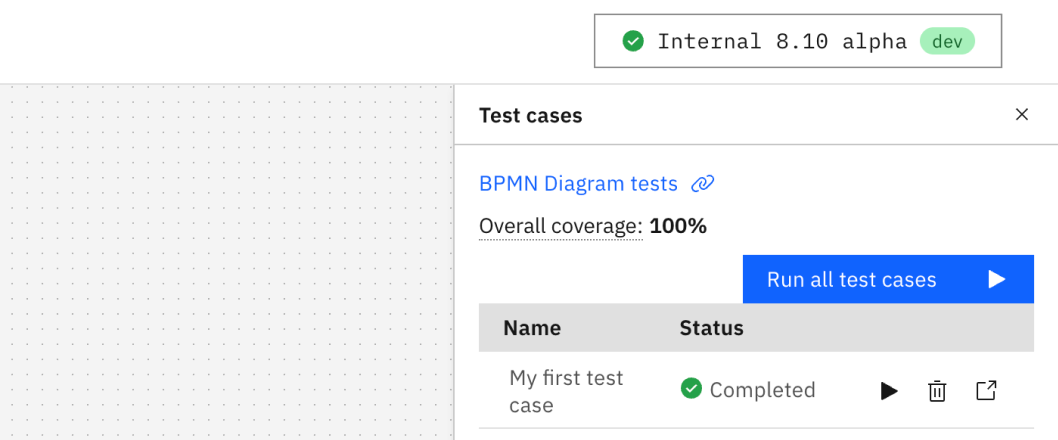
Test coverage will not display as expected if you edit or remove the "metadata" field in the test file.
Run a test case
You can run test from the Test cases panel by clicking Run all test cases button or the Run test case button for each individual test case.
- Test case execution results are marked with either a Completed or Failed status.
- If a test case fails, click Repair against each step to update it, especially if diagram changes require further user input (such as when a new flow node is added to a previously saved test case path). See Repair a test case.
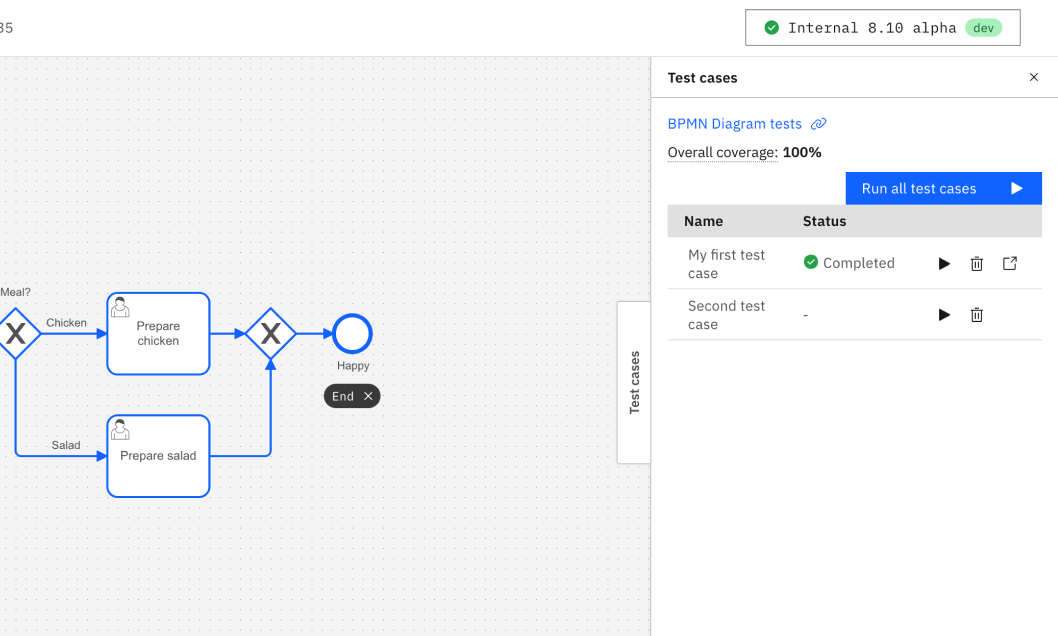
Review test results
A test case passes only when every step, including its assertions, succeeds, not just when the process completes without an incident.
- The overall test case status is either Passed or Failed.
- When a test case fails, Test mode highlights the failed step and shows the underlying failure message verbatim (for example, an expected-versus-actual value mismatch for a variable assertion).
Repair a test case
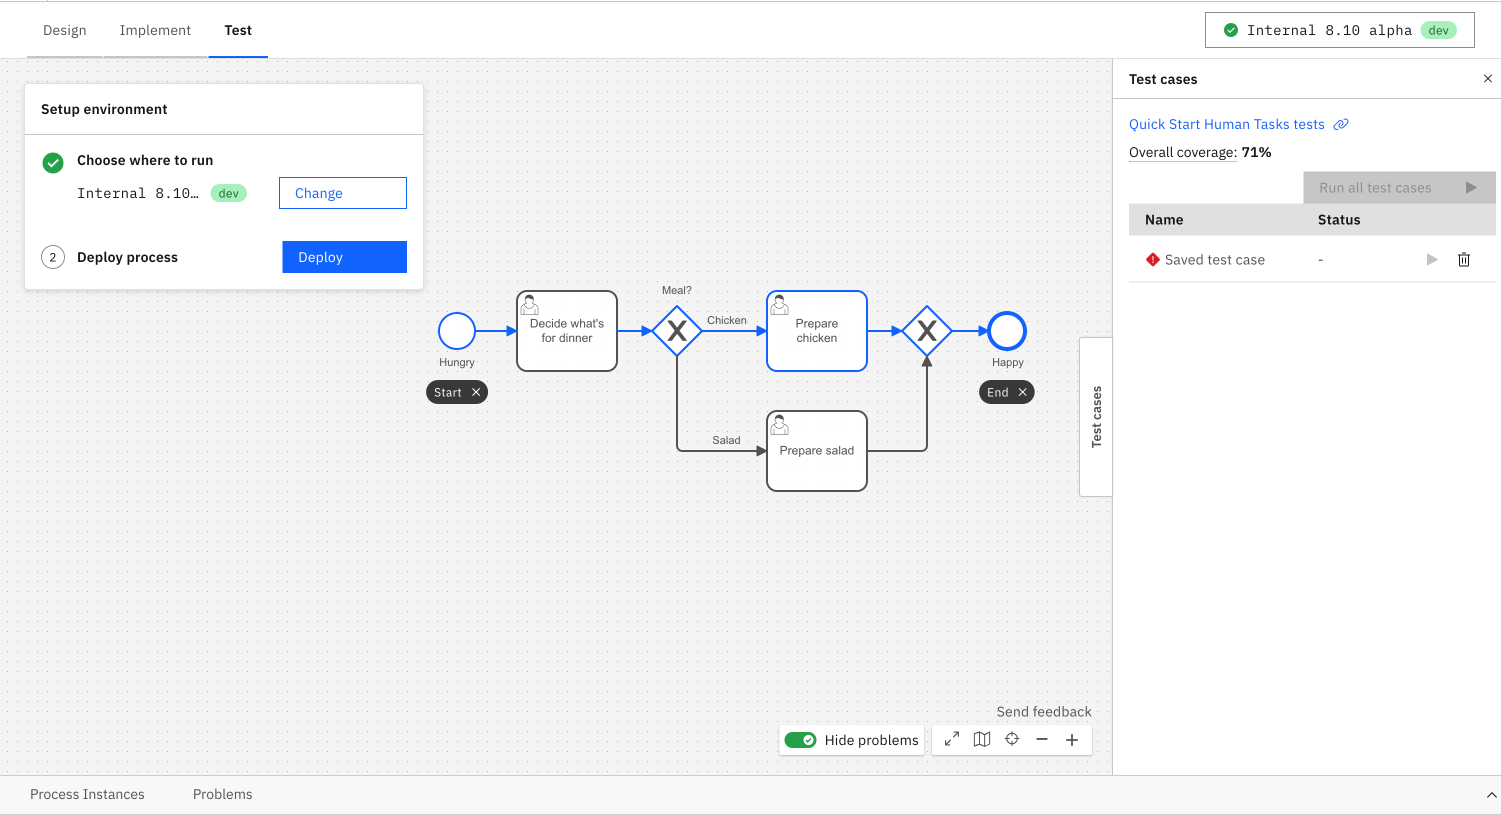
When a BPMN change removes or renames an element that an instruction or assertion refers to, the test case can break. It may fail unexpectedly or pass silently because Test mode skips the broken step.
-
Test mode flags broken test cases with an indicator in the test case list. A callout in the test case detail view explains what's broken.
-
Use the graphical repair view to fix most breakages without editing JSON: remap an instruction or assertion to a different element, select a new expected value, edit a step in place, or delete it.
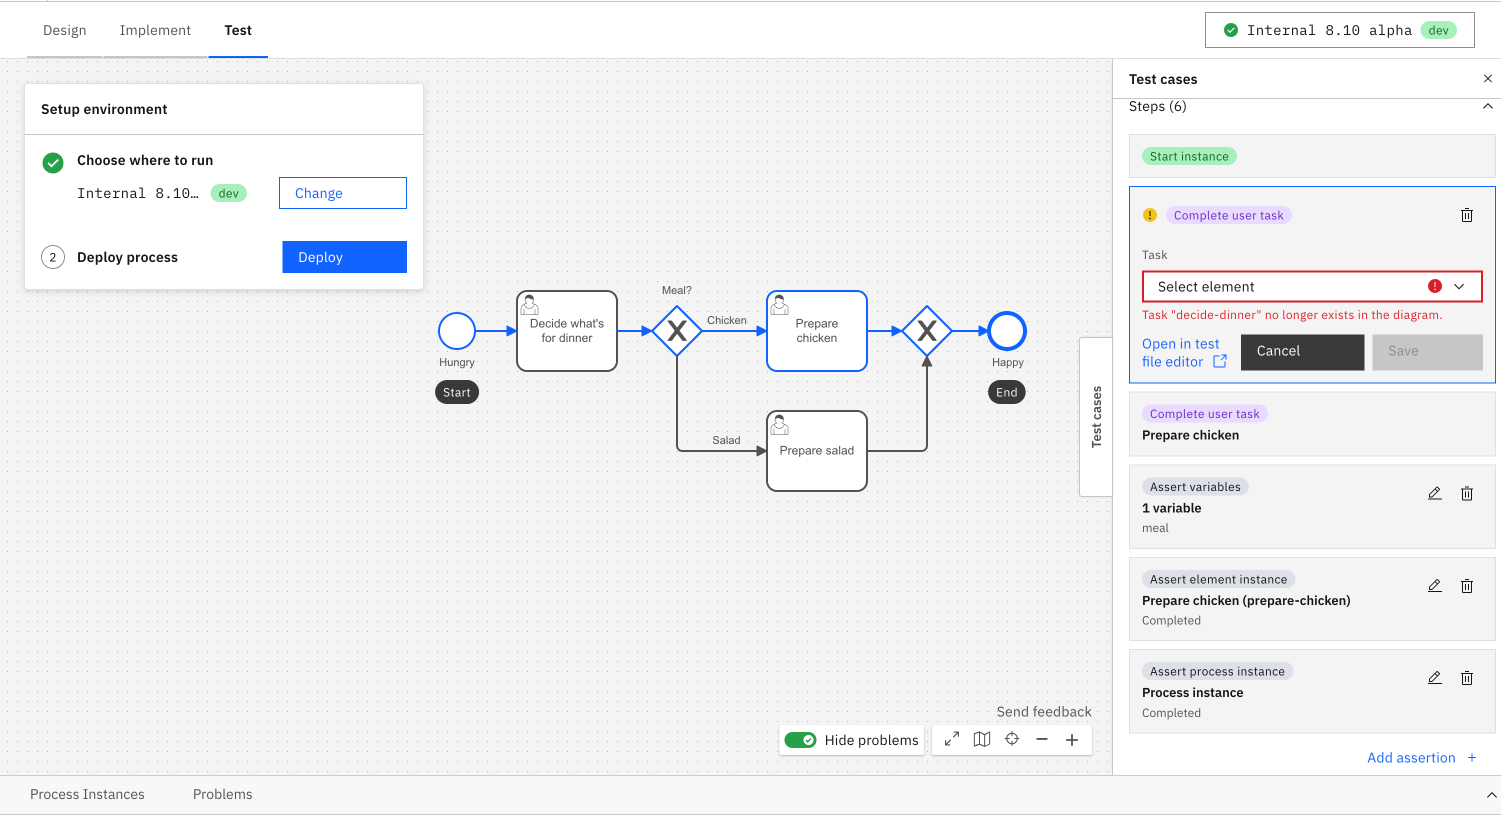
- For changes the graphical repair view doesn't cover, open the test file in Camunda Hub's file editor and edit the JSON directly. Then, return to Test mode and rerun the test case.
Limitations
Test mode displays a warning badge on diagram elements with known limitations. Use the Show problems/Hide problems toggle near the canvas controls to show or hide these badges.
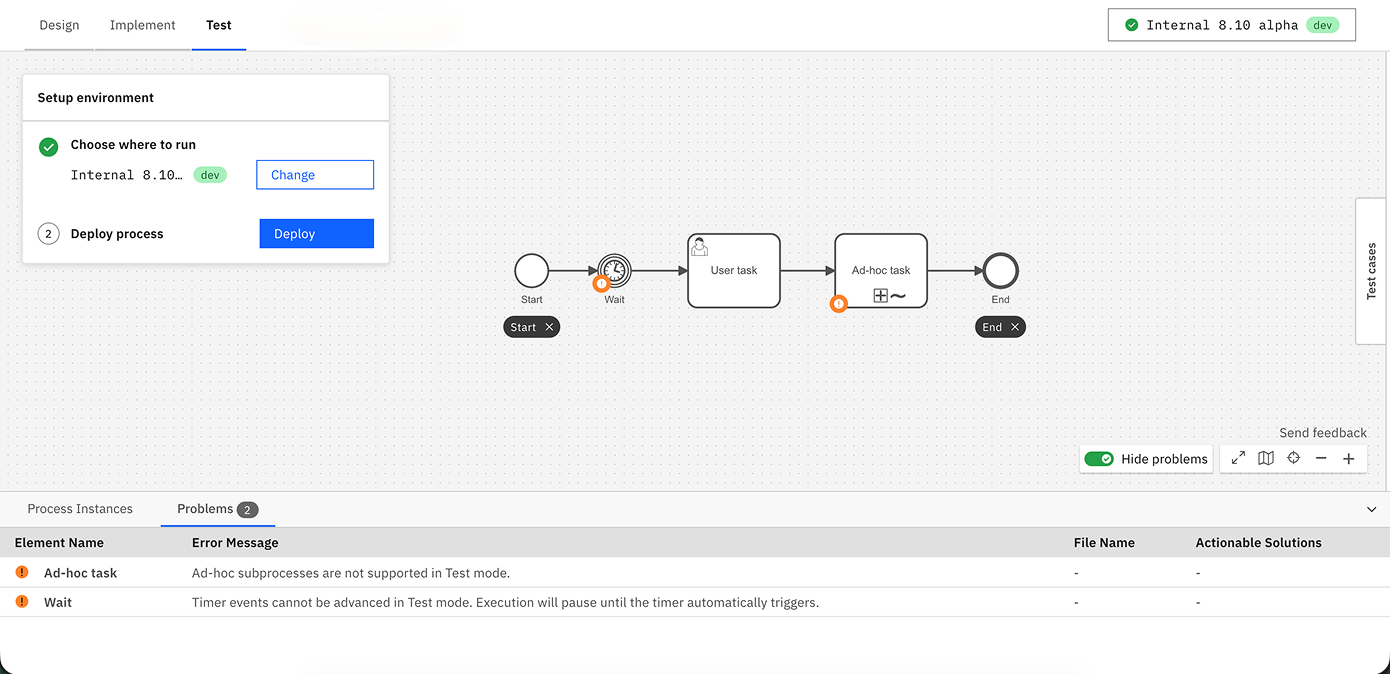
- Call activities are not supported. Test cases containing call activities cannot be executed successfully.
- Ad-hoc sub-processes are not supported. Test cases containing ad-hoc sub-processes cannot be executed successfully.
- Timer events can't be manually triggered. When a test case reaches a timer event, execution pauses until the timer fires automatically. To skip a timer, use process instance modification to move the token to the next element.
- Test case paths that include process modifications are not supported.
- Similarly to process instances, test cases do not run in isolation. For example, if two test case paths are defined for a process and both contain the same message event or signal event, running these test cases simultaneously might lead to unintended consequences. Publishing a message or broadcasting a signal could inadvertently impact the other test case, resulting in the failure of both.
- Test mode test cases are compatible with the CPT JSON instruction format, but the following instructions are not supported and will be skipped during execution:
ASSERT_PROCESS_INSTANCE_MESSAGE_SUBSCRIPTIONCOMPLETE_JOB_USER_TASK_LISTENERCORRELATE_MESSAGEEVALUATE_CONDITIONAL_START_EVENTEVALUATE_DECISIONINCREASE_TIMEMOCK_CHILD_PROCESSMOCK_DMN_DECISIONMOCK_JOB_WORKER_COMPLETE_JOBMOCK_JOB_WORKER_THROW_BPMN_ERRORSET_TIME
Modify a process instance
There are two main reasons to modify a process instance in Test mode:
- Skip elements: If your process is stuck, you can continue testing by skipping over elements. For instance, rather than waiting for a 24-hour timer event to elapse or resolving an incident, you can manually advance the active token from the timer event to the next flow node.
- Faster prototyping: Rather than completing the entire process, you can skip over unnecessary sections of a large diagram to debug the changes you made.
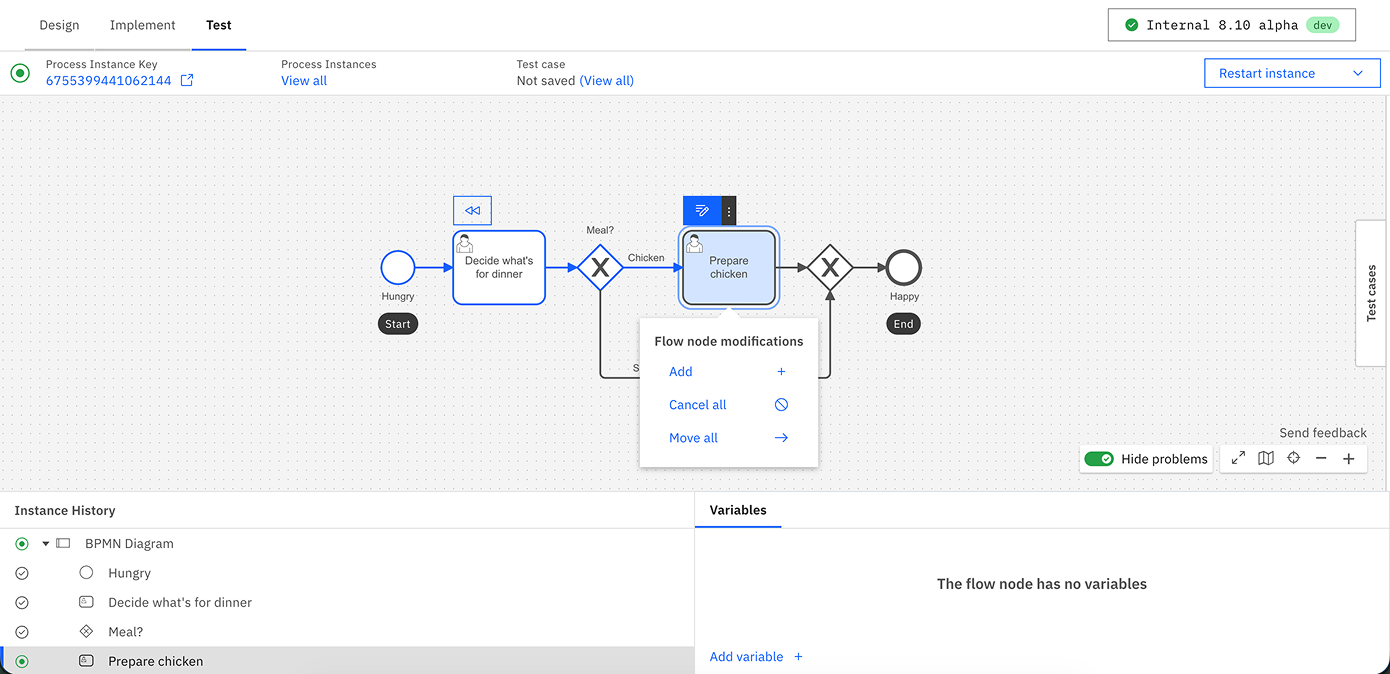
There are three ways to modify your process instance:
- Add token: Select the flow node where you'd like to initiate a new token and select Add from the modification dropdown.
- Cancel tokens: Select the flow node where you'd like to cancel active tokens and select Cancel from the modification dropdown.
- Move tokens: Select the flow node from which you'd like to move active tokens and select Move from the modification dropdown. Then, select a target flow node to relocate the tokens.
Unlike in Operate, these changes are applied immediately. If you need to change variables while modifying a process, use the Variables panel to set them separately. Alternatively, for advanced use cases you can modify the process instance from Operate.
Limitations
Rewinding a process instance that has modifications applied to is currently not supported. Additionally, some elements do not support specific modifications:
- Add token/Move tokens to modifications are not possible for the following element types:
- Start events
- Boundary events
- Events attached to event-based gateways
- Move tokens from modification is not possible for a subprocess itself.
- Add token modifications are not currently supported for elements with multiple running scopes. However, Move tokens modifications are supported for elements inside multi-instance subprocesses. The move operation terminates the specific element instance and activates the target element in the same instance of the multi-instance subprocess.
Rapid iteration
To make changes, switch back to Implement mode. When returning to Test mode, your process needs to be redeployed. Test mode only shows process instances from the process’s most recent version, so you may not see your previous instances.
Test mode saves your inputs when completing user task forms. It auto-fills your last response if you open the same form later in the session. You can click Reset to reset the form to its defaults.
Details
Depending on the BPMN element, there may be a different action:
- User tasks with an embedded form are displayed on click. However, you cannot track assignment logic.
- Call activities can be navigated into and performed.
- Manual tasks, undefined tasks, script tasks, business rule tasks, gateways, outbound connectors and other BPMN elements that control the process's path are automatically completed based on their configuration.
- Service tasks, inbound connectors, message-related tasks, or events are simulated on click or triggered from an external client. However, Test mode attempts message correlation based on the process context but cannot infer keys from FEEL expressions. Therefore, these keys must be manually entered by publishing a message using secondary actions.
- Many action icons have secondary actions. For example, user tasks can be completed with variables rather than a form, and service tasks can trigger an error event.
Operate vs. Test mode
Operate is designed to monitor many production process instances and intervene only as necessary, while Test mode is designed to drive a single process instance through the process and mock external systems.
Both offer monitoring of a single process instance, its variables and path, incidents, and actions to modify or repair a process instance. Operate offers bulk actions and guardrails against breaking production processes, while Test mode offers a streamlined UX to run through test cases quickly.
Limitations and availability
This section explains why you might not see the Test tab, and any additional limitations.
For more information about terms, refer to our licensing and terms page.
Version compatibility: Test mode is compatible with cluster versions starting from 8.10 and higher.
Camunda 8 SaaS
In Camunda 8 SaaS, Test mode is available to all Camunda Hub users with commenter, editor, or admin permissions within a project. Additionally, within their organization, users need to have a role which has deployment privileges. If authorizations are enabled on the environment, users need to have specific permissions instead.
Camunda 8 Self-Managed
In Self-Managed, Test mode is controlled by the camunda.hub.feature.test-mode-enabled configuration property in Camunda Hub. This is true by default for the Docker and Kubernetes distributions.
Prior to the 8.10 release, Test mode can be accessed by installing the 8.10.0-alpha Helm charts, or running the 8.10.0-alpha Docker Compose configuration.
Features
- Decision table rule evaluations are not viewable from Test mode. However, they can be inferred from the output variable, or can be viewed from Operate.
- Currently, Test mode supports displaying up to 100 flow node instances in the instance history panel, 100 variables in the variables panel, and 100 process instances on the process definition page. To access all related data, you can use Operate.
- While you can still interact with your process instance in Test mode (for example, completing jobs or publishing messages), you may be unable to resolve incidents if they occur beyond the 100th flow node instance, as Test mode does not track them. In this case, incident resolution can be managed in Operate.
- User tasks with a job worker implementation are deprecated and no longer supported in Test mode from cluster versions 8.8 and above. Please consider migrating to Camunda user tasks.
Use Test mode with Camunda Self-Managed
After selecting the Test tab in Self-Managed, the Test view opens directly. The environment selection and deployment flow is the same as in SaaS, see opening the Test tab.
Limitations
- The environment variables
CAMUNDA_CUSTOM_CERT_CHAIN_PATH,CAMUNDA_CUSTOM_PRIVATE_KEY_PATH,CAMUNDA_CUSTOM_ROOT_CERT_PATH, andCAMUNDA_CUSTOM_ROOT_CERT_STRINGcan be set in Docker or Helm chart setups. However, these configurations have not been tested with Test mode's behavior, and therefore are not supported when used with Test mode. - Test mode cannot check the presence of connector secrets in Self-Managed setups. If a secret is missing, Test mode will show an incident at runtime. Learn more about configuring connector secrets.
Test usage and billing considerations
The use of Test mode may result in additional charges depending on your organization's plan and the type of cluster you are using. To avoid extra costs, follow these guidelines based on your plan:
- Enterprise plan: Use a Basic cluster for non-production testing to avoid costs. For further assistance, contact Camunda support.
- Free trial plan: You can use any cluster. See Free Trial clusters.