Get started as a Java developer using Spring
In this guide, we'll step through using Spring Boot and the Spring Zeebe SDK with Desktop Modeler to interact with your local Self-Managed Camunda 8 installation. While this guide focuses on Self-Managed, you can do something similar with SaaS.
This guide specifically uses Java and Spring because the two, in combination with Camunda 8, is our default technology stack recommendation.
By the end of this tutorial, you'll be able to use Spring and Java code with Zeebe to:
- Deploy a process model.
- Initiate a process instance.
- Handle a service task.
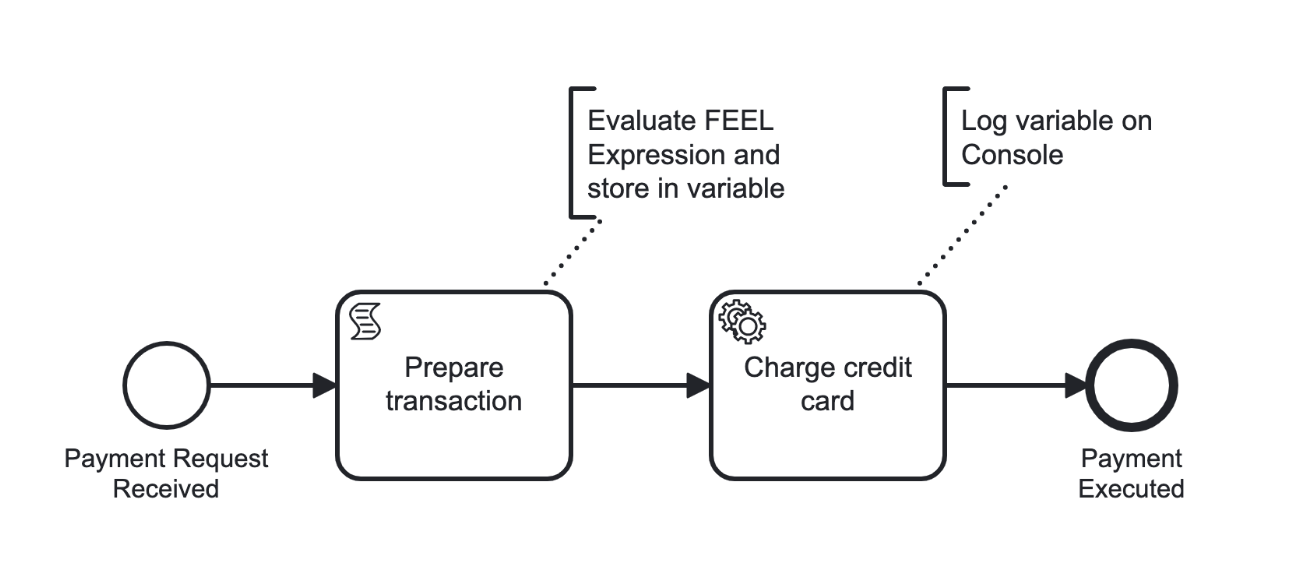
For example, in this guide we will outline a BPMN model to receive a payment request, prepare a transaction, charge a credit card, and execute a payment:
While stepping through this guide, you can visit our sample repository with the completed code to check your work.
Prerequisites
Before getting started, ensure you have the following in your local environment:
- Access to your preferred code editor or IDE
- OpenJDK 21+ and Maven 3
- Camunda 8 Desktop Modeler and Camunda 8 Run
After installing OpenJDK, ensure JAVA_HOME is set by running java -version in a new terminal.
If no version of Java is found, follow your chosen installation's instructions for setting JAVA_HOME before continuing.
Step 1: Create a new Spring Boot project
Next, create a new Spring Boot project:
- Go to https://start.spring.io/ to get started.
- Under Project, select Maven. Under Language, select Java. Under Spring Boot, select the latest non-SNAPSHOT version (currently 3.4.4).
- Under Project Metadata, configure the following or use the pre-filled shortcut:
- Group:
io.camunda.demo - Artifact:
process_payments - Name:
Process payments - Description:
Process payments with Camunda - Package name:
io.camunda.demo.process_payments - Packaging:
Jar - Java: Select the Java version you have installed.
- For this tutorial, we will not install any dependencies.
- Group:
- Click Generate.
- Download the project, extract the
.zipfile, and add the contents to your desired location. - Open this project in your preferred code editor.
- From within the extracted directory, run
mvn spring-boot:runin your terminal to confirm your Spring project builds. - (Optional) Run
git initif you'd like to commit milestones along the way, and add a.gitignorefile containingtarget/to ignore build artifacts.
Step 2: Create a new BPMN diagram
Next, we'll create a BPMN diagram to represent the transaction model shown at the beginning of this guide:
- Open Desktop Modeler.
- Click Create a new diagram in Camunda 8.
- Toggle the properties panel from the Window menu if it is not already visible, and make the following changes in the General section:
- Name your diagram
Process payments - Set the ID to
process-payments
- Name your diagram
- Add a start event, and name it
Payment request received. - Append a task named
Prepare transaction. - Click on the element and select the Change element menu icon to change the type of task to a script task, and configure the following properties:
- Implementation:
FEEL expressionWhat is FEEL? - Script/Result variable:
totalWithTax - Script/FEEL expression:
total * 1.1(this represents the tax applied to the transaction.)
- Implementation:
- Append a task named
Charge credit card. - Click on the element and select the Change element menu icon to change the type of task to a service task. In the properties panel, change the Task definition/Job type to
charge-credit-card. - Append an end event named
Payment executed. - Save this BPMN file to your Spring project in
src/main/resources, and name itprocess-payments.bpmn.
Step 3: Deploy your process from Desktop Modeler
To deploy your process, take the following steps:
- Open Desktop Modeler and ensure the desired Camunda 8 version is targeted in the bottom left corner. You can change the desired version by clicking on the version, selecting a new one, and selecting Apply.
- Click the rocket icon in the bottom left corner.
- Change the Deployment name to
process-payments, and ensure the Target isCamunda 8 Self-Managed. - Change the Cluster endpoint to
http://localhost:26500, with no authentication. - Click Deploy.
When you open Operate at http://localhost:8080/operate/ (or http://localhost:8081 when using Camunda 8 Run with Docker Compose), you should now note the process deployed to your local Self-Managed setup.
Step 4: Run your process from Desktop Modeler
To run your process, take the following steps:
- From Desktop Modeler, click the "play" icon (next to the rocket icon to deploy) in the bottom left corner.
- In Variables, insert the JSON object
{"total": 100}. - Click Start.
From Operate, you should now notice a process instance running. You'll notice the process instance is waiting at Charge credit card, because we'll need to configure a job worker.
Step 5: Implement a service task
To implement a service task, take the following steps:
Configure Spring Boot Starter
Add the following Maven dependency to your Spring Boot Starter project's pom.xml file, replacing x with the latest patch level available:
<dependency>
    <groupId>io.camunda</groupId>
    <artifactId>spring-boot-starter-camunda-sdk</artifactId>
    <version>8.7.x</version>
</dependency>
Configure the Camunda client
- Rename your
src/main/resources/application.propertiesfile toapplication.yaml. - Paste the following settings to connect to the Self-Managed Zeebe Broker:
camunda:
  client:
    mode: self-managed
    zeebe:
      enabled: true
      grpc-address: http://127.0.0.1:26500
      rest-address: http://127.0.0.1:8080
Ensure you provide grpcAddress and restAddress in absolute URI format: scheme://host(:port).
Create a worker
- In
src/main/java/io/camunda/demo/process_payments/, create a file calledChargeCreditCardWorker.java. - In the file created above, paste the following dependencies and package
package io.camunda.demo.process_payments:
package io.camunda.demo.process_payments;

import java.util.Map;

import org.slf4j.Logger;
import org.slf4j.LoggerFactory;
import org.springframework.stereotype.Component;

import io.camunda.zeebe.spring.client.annotation.JobWorker;
import io.camunda.zeebe.spring.client.annotation.Variable;
- Next, we can add a
ChargeCreditCardWorkerclass decorated with@Componentand instantiate a logger. Additionally, we will add achargeCreditCardmethod and decorate it with@JobWorker, specifying the type of service tasks it will handle. The method takes a@Variable(name = "totalWithTax") Double totalWithTaxargument to indicate which variables it needs from the task. The implementation of the method will log thetotalWithTax, and return a map, to indicate to Zeebe that the task has been handled:
@Component
public class ChargeCreditCardWorker {
  private final static Logger LOG = LoggerFactory.getLogger(ChargeCreditCardWorker.class);
  @JobWorker(type = "charge-credit-card")
  public Map<String, Double> chargeCreditCard(@Variable(name = "totalWithTax") Double totalWithTax) {
    LOG.info("charging credit card: {}", totalWithTax);
    return Map.of("amountCharged", totalWithTax);
  }
}
To check your work, visit our sample repository with the completed code.
In your terminal, run mvn spring-boot:run, where you should see the charging credit card output. In Operate, refresh if needed, and note the payment has executed.
Since the application is now running a worker subscribed to the workflow engine, it will not exit until you hit Ctrl+C.
Step 6: Start a process instance
To start a process instance programmatically, take the following steps:
- In
ProcessPaymentsApplication.java, add the following dependencies after the package definition:
package io.camunda.demo.process_payments;

import java.util.Map;
import org.slf4j.Logger;
import org.slf4j.LoggerFactory;
import org.springframework.beans.factory.annotation.Autowired;
import org.springframework.boot.CommandLineRunner;
import org.springframework.boot.SpringApplication;
import org.springframework.boot.autoconfigure.SpringBootApplication;

import io.camunda.zeebe.client.ZeebeClient;
import io.camunda.zeebe.spring.client.annotation.Deployment;
- Convert the application to a
CommandLineRunner, by addingimplements CommandLineRunnerto theProcessPaymentsApplicationclass declaration. Instantiate a staticLoggervariable, and an instance variable namedzeebeClientwith the@Autowiredannotation.
@SpringBootApplication
public class ProcessPaymentsApplication implements CommandLineRunner {

	private static final Logger LOG = LoggerFactory.getLogger(ProcessPaymentsApplication.class);

	@Autowired
	private ZeebeClient zeebeClient;

	public static void main(String[] args) {
		SpringApplication.run(ProcessPaymentsApplication.class, args);
	}
}
- Implement an overriding
runmethod inProcessPaymentsApplication. When the application runs, it will create a newprocess-paymentsprocess instance, of the latest version, with specified variables, and send it to our local Self-Managed instance:
	@Override
	public void run(final String... args) {
		var bpmnProcessId = "process-payments";
		var event = zeebeClient.newCreateInstanceCommand()
				.bpmnProcessId(bpmnProcessId)
				.latestVersion()
				.variables(Map.of("total", 100))
				.send()
				.join();
		LOG.info("started a process instance: {}", event.getProcessInstanceKey());
	}
To check your work, visit our sample repository with the completed code.
Re-run the application in your terminal with mvn spring-boot:run to see the process run, and note the instance history in Operate.
Step 7: Deploy your process upon application start
To deploy your process upon application start, take the following steps:
- Decorate the
ProcessPaymentsApplicationclass with@Deployment(resources = "classpath:process-payments.bpmn")inProcessPaymentsApplication.java:
@SpringBootApplication
@Deployment(resources = "classpath:process-payments.bpmn")
- In Desktop Modeler, change the tax amount calculated to
total * 1.2under FEEL expression and save your changes.
Re-run the application in your terminal with mvn spring-boot:run to see the process run. In Operate, note the new version 2 when filtering process instances, and the tax amount has increased for the most recent process instance.