Dual-region ROSA HCP Cluster with Terraform
This guide provides a detailed tutorial for deploying two Red Hat OpenShift on AWS (ROSA) cluster with Hosted Control Plane (HCP) in two different regions. It is specifically tailored for deploying Camunda 8 using Terraform, a widely-used Infrastructure as Code (IaC) tool, details of the High Level design are available in the generic Red Hat OpenShift dual-region for Camunda 8 guide.
We recommend this guide for building a robust and sustainable infrastructure that needs to survive a region lost.
This guide aims to help you leverage IaC to streamline and reproduce your cloud infrastructure setup. While it covers the essentials for deploying an ROSA HCP cluster, for more advanced use cases, please refer to the official Red Hat OpenShift on AWS Documentation.
If you are completely new to Terraform and the idea of IaC, read through the Terraform IaC documentation and give their interactive quick start a try for a basic understanding.
Requirements
- A Red Hat Account to create the Red Hat OpenShift cluster.
- An AWS account to create any resources within AWS.
- AWS CLI, a CLI tool for creating AWS resources.
- Terraform
- kubectl to interact with the cluster.
- ROSA CLI to interact with the cluster.
- jq to interact with some Terraform variables.
- This guide uses GNU/Bash for all the shell commands listed.
For the tool versions used, check the .tool-versions file in the repository. It contains an up-to-date list of versions that Camunda also uses for testing.
Considerations
This setup provides a foundational starting point for working with Camunda 8, though it is not optimized for peak performance. It serves as a solid initial step in preparing a production environment by leveraging Infrastructure as Code (IaC) tools.
Terraform can initially appear complex. If you're new to it, you might want to start by considering deployment in a single region first.
Following this guide will incur costs on your cloud provider account and your Red Hat account, specifically for the managed OpenShift service, OpenShift worker nodes running in EC2, the hosted control plane, Elastic Block Storage (EBS), and Route 53. For more details, refer to ROSA AWS pricing and the AWS Pricing Calculator as total costs vary by region.
Outcome
Infrastructure diagram for a dual region ROSA setup (click on the image to open the PDF version)
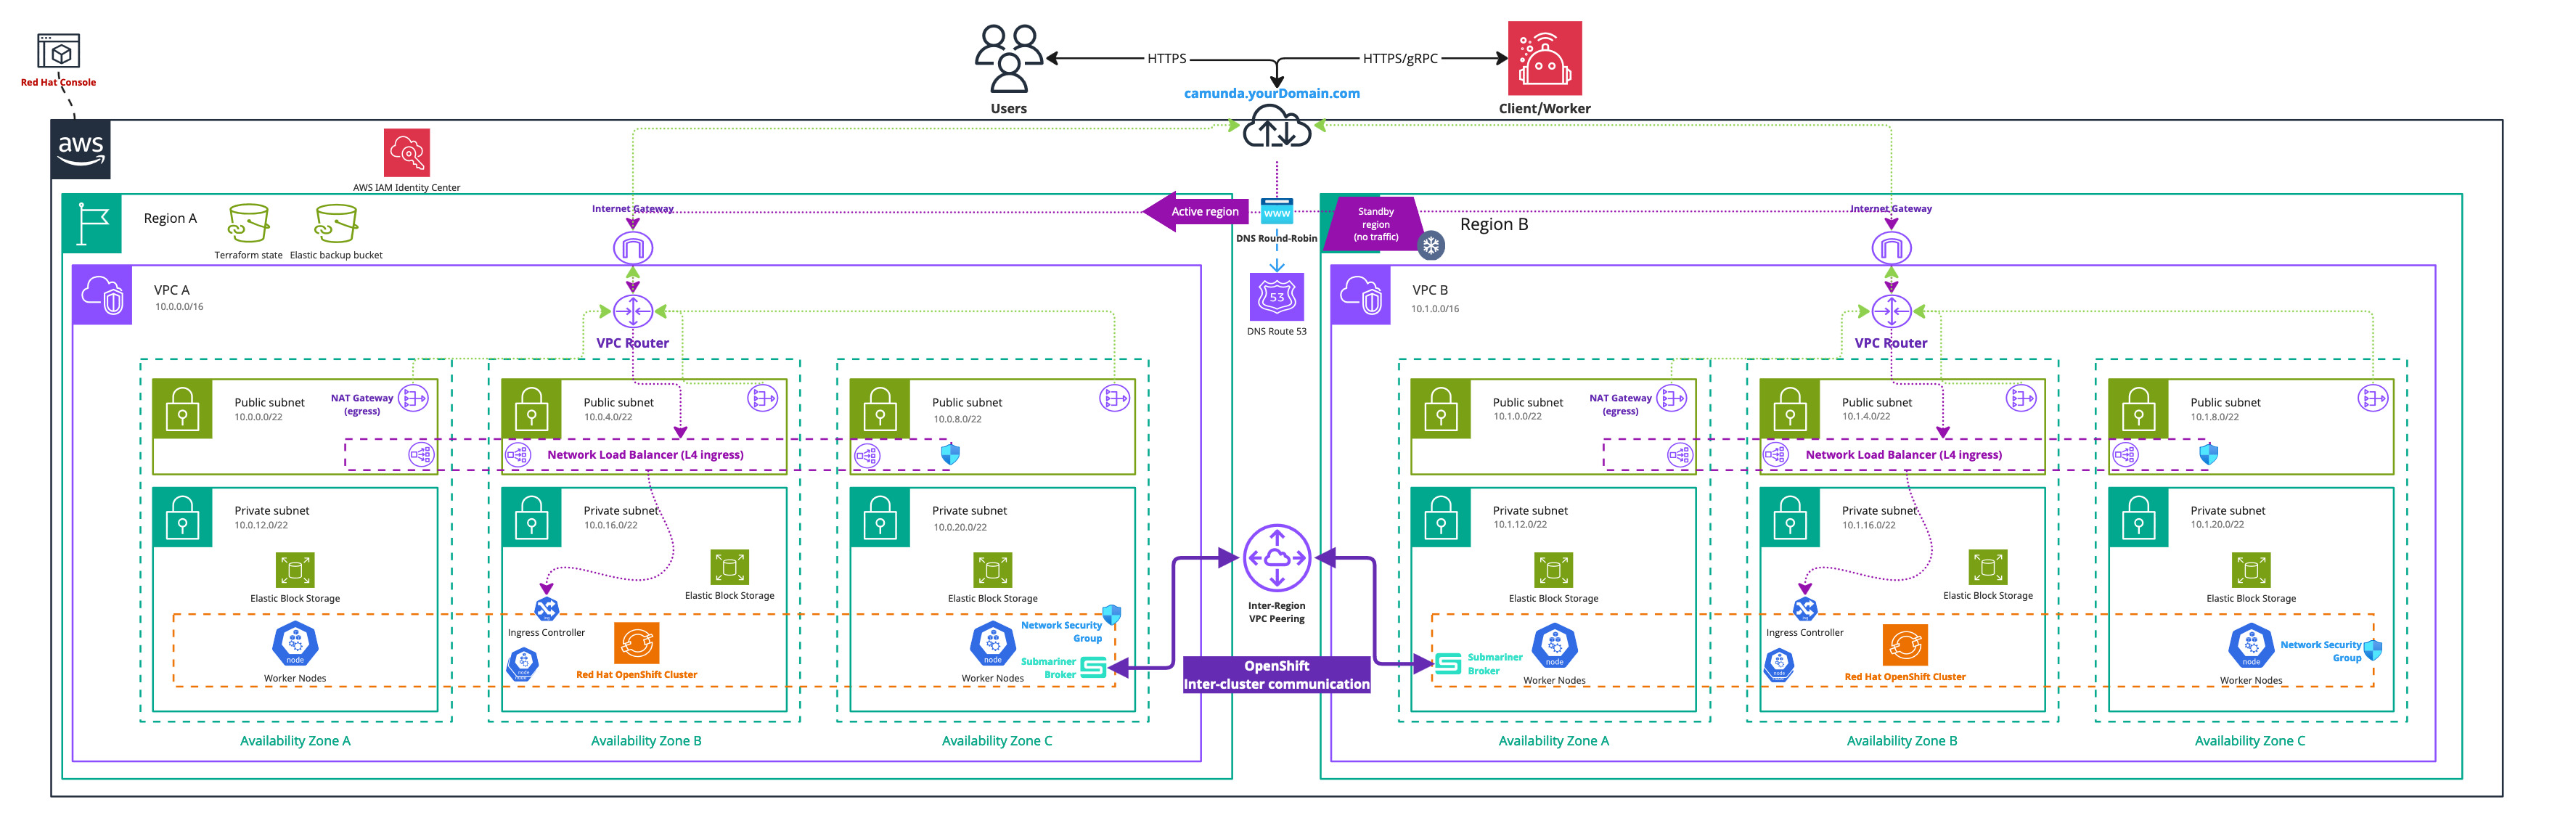
Following this tutorial and steps will result in:
- Two Red Hat OpenShift with Hosted Control Plane clusters running the latest ROSA version, each with six nodes ready for Camunda 8 installation in separate regions.
- The EBS CSI driver installed and configured, enabling the Camunda 8 Helm chart to create persistent volumes.
- VPC Peering configured to enable cross-region cluster communication.
- An Amazon Simple Storage Service (S3) bucket for Elasticsearch backups.
- Red Hat OpenShift Advanced Cluster Management used to manage the two clusters and configure Submariner.
- Submariner configured on the two clusters to enable cross-namespace and cross-cluster network communication.
1. Configure AWS and initialize Terraform
Obtain a copy of the reference architecture
The first step is to download a copy of the reference architecture from the GitHub repository. This material will be used throughout the rest of this documentation, the reference architecture is versioned using the same Camunda versions (stable/8.x).
loading...
With the reference architecture copied, you can proceed with the remaining steps outlined in this documentation. Ensure that you are in the correct directory before continuing with further instructions.
Terraform prerequisites
To manage the infrastructure for Camunda 8 on AWS using Terraform, we need to set up Terraform's backend to store the state file remotely in an S3 bucket. This ensures secure and persistent storage of the state file.
Advanced users may want to handle this part differently and use a different backend. The backend setup provided is an example for new users.
Set up AWS authentication
The AWS Terraform provider is required to create resources in AWS. Before you can use the provider, you must authenticate it using your AWS credentials.
A user who creates resources in AWS will always retain administrative access to those resources, including any Kubernetes clusters created. It is recommended to create a dedicated AWS IAM user for Terraform purposes, ensuring that the resources are managed and owned by that user.
You can further change the region and other preferences and explore different authentication methods:
-
For development or testing purposes you can use the AWS CLI. If you have configured your AWS CLI, Terraform will automatically detect and use those credentials. To configure the AWS CLI:
aws configureEnter your
AWS_ACCESS_KEY_ID,AWS_SECRET_ACCESS_KEY, region, and output format. These can be retrieved from the AWS Console. -
For production environments, we recommend the use of a dedicated IAM user. Create access keys for the new IAM user via the console, and export them as
AWS_ACCESS_KEY_IDandAWS_SECRET_ACCESS_KEY.
Create an S3 bucket for Terraform state management
Before setting up Terraform, you need to create an S3 bucket that will store the state file. This is important for collaboration and to prevent issues like state file corruption.
To simplify the process and avoid repeating the region in each command, set your desired AWS region as an environment variable:
export S3_TF_BUCKET_REGION="<your-region>"
Replace <your-region> with the AWS region where you want to create the S3 bucket (e.g., us-east-2).
Regions outside of us-east-1 require the appropriate LocationConstraint to be specified in order to create the bucket in the desired region.
While us-east-1 does not require it and can only be created without specifying it.
This region can be different from the regions used for other resources, but it requires to be set explicitly in the backend configuration using the flag: -backend-config="region=<your-region>".
For clarity, this guide explicitly sets the bucket region in all relevant commands.
Steps to create the S3 bucket with versioning enabled:
-
Open your terminal and ensure the AWS CLI is installed and configured.
-
Use the following command to create an S3 bucket. Replace
my-rosa-dual-tf-statewith a unique bucket name:export S3_TF_BUCKET_NAME="my-rosa-dual-tf-state"
aws s3api create-bucket --bucket "$S3_TF_BUCKET_NAME" --region "$S3_TF_BUCKET_REGION" \
--create-bucket-configuration LocationConstraint="$S3_TF_BUCKET_REGION" -
Enable versioning on the S3 bucket to track changes and protect the state file from accidental deletions or overwrites:
aws s3api put-bucket-versioning --bucket "$S3_TF_BUCKET_NAME" --versioning-configuration Status=Enabled --region "$S3_TF_BUCKET_REGION" -
Secure the bucket by blocking public access:
aws s3api put-public-access-block --bucket "$S3_TF_BUCKET_NAME" --public-access-block-configuration \
"BlockPublicAcls=true,IgnorePublicAcls=true,BlockPublicPolicy=true,RestrictPublicBuckets=true" --region "$S3_TF_BUCKET_REGION" -
Verify versioning is enabled on the bucket:
aws s3api get-bucket-versioning --bucket "$S3_TF_BUCKET_NAME" --region "$S3_TF_BUCKET_REGION"
This S3 bucket will now securely store your Terraform state files with versioning enabled.
OpenShift clusters module setup
This module sets up the foundational configuration for ROSA HCP and Terraform usage.
We will leverage Terraform modules, which allow us to abstract resources into reusable components, simplifying infrastructure management.
The Camunda-provided module is publicly available and serves as a starting point for deploying Red Hat OpenShift clusters on AWS using a Hosted Control Plane. It is highly recommended to review this module before implementation to understand its structure and capabilities.
Please note that this module is based on the official ROSA HCP Terraform module documentation. It is presented as an example for running Camunda 8 in ROSA.
For production or advanced use cases or custom setups, we encourage you to use the official module, which includes vendor-supported features.
Set up ROSA authentication
To set up a ROSA cluster, certain prerequisites must be configured on your AWS account. Below is an excerpt from the official ROSA planning prerequisites checklist:
-
Verify that your AWS account is correctly configured:
aws sts get-caller-identity -
Check if the ELB service role exists, as if you have never created a load balancer in your AWS account, the role for Elastic Load Balancing (ELB) might not exist yet:
aws iam get-role --role-name "AWSServiceRoleForElasticLoadBalancing"If it doesn't exist, create it:
aws iam create-service-linked-role --aws-service-name "elasticloadbalancing.amazonaws.com" -
Create a Red Hat Hybrid Cloud Console account if you don't already have one: Red Hat Hybrid Cloud Console.
-
Enable ROSA on your AWS account via the AWS Console.
-
Enable HCP ROSA on AWS Marketplace:
- Navigate to the ROSA console: AWS ROSA Console.
- Choose Get started.
- On the Verify ROSA prerequisites page, select I agree to share my contact information with Red Hat.
- Choose Enable ROSA.
AWS billing account vs. associated AWS infrastructure accountOnly a single AWS billing account can be associated with a Red Hat account for ROSA service billing. This is the account linked through the AWS Marketplace activation step above.
However, the associated AWS infrastructure account — the account where the ROSA cluster resources (EC2 instances, VPCs, etc.) are actually deployed — can be a different AWS account. This allows organizations to separate billing ownership from infrastructure management. For more details, see the ROSA billing FAQ.
-
Install the ROSA CLI from the OpenShift AWS Console.
-
Get an API token, go to the OpenShift Cluster Management API Token, click Load token, and save it. Use the token to log in with ROSA CLI:
export RHCS_TOKEN="<yourToken>"
rosa login --token="$RHCS_TOKEN"

# Verify the login
rosa whoami -
Create the required account and OCM roles using AWS STS (Security Token Service):
rosa create account-roles --mode auto
rosa create ocm-role --mode auto
STS mode (recommended)ROSA HCP uses AWS STS by default. STS provides short-lived, temporary credentials through IAM roles instead of long-lived access keys, following AWS security best practices.
account-roles: Creates the account-wide IAM roles that ROSA needs to manage AWS resources (installer, support, control plane, and worker roles).ocm-role: Links the OpenShift Cluster Manager (OCM) to your AWS account, enabling OCM to manage clusters on your behalf.
The
--mode autoflag allows the ROSA CLI to create and link the roles automatically. For environments with stricter IAM policies, use--mode manualto review and apply the IAM policies yourself. See the ROSA STS IAM documentation for details. -
If quotas are insufficient, consult the following:
-
Ensure the
ocCLI is installed. If it's not already installed, follow the official ROSA oc installation guide:rosa verify openshift-client
Configure CLUSTER_1_REGION and CLUSTER_2_REGION with the target regions respectively.
# Set the region, adjust as needed
export CLUSTER_1_REGION="us-east-1"
export CLUSTER_2_REGION="us-east-2"
Verify your AWS quotas for each region:
rosa verify quota --region="$CLUSTER_1_REGION"
rosa verify quota --region="$CLUSTER_2_REGION"
This may fail due to organizational policies.
Set up the ROSA clusters module
The dual-cluster setup requires managing two distinct clusters in different regions. For the simplicity of usage, we will manage the two clusters using a single module, therefore this guide uses a dedicated aws terraform provider for each region.
-
Ensure you are in the reference architecture directory of the cloned repository:
./aws/openshift/rosa-hcp-dual-region. Then, navigate into theclustersmodule:ls
# Example output:
# clusters peering backup_bucket
cd clusters -
Configure your topology deployment, as you will use multiple regions, specify
CLUSTER_1_REGIONandCLUSTER_2_REGIONwith the target regions respectively.# set the region, adjust to your needs
export CLUSTER_1_REGION="us-east-1"
export CLUSTER_2_REGION="us-east-2"
# ensure bucket variables are set
export S3_TF_BUCKET_REGION="<your-region>"
export S3_TF_BUCKET_NAME="my-rosa-dual-tf-state" -
Ensure that your
RHCS_TOKENis defined and valid (otherwise, renew it on OpenShift Cluster Management API Token):rosa login --token="$RHCS_TOKEN" -
Review the module configuration file
config.tf. This configuration will use the previously created S3 bucket for storing the Terraform state file:8.7/aws/openshift/rosa-hcp-dual-region/terraform/clusters/config.tfloading... -
Review the file named
cluster_region_1.tfin the same directory. This file describes the cluster of the region 1, you may want to customize thelocalsvariables with parameters of your choice, those are described in the next steps.8.7/aws/openshift/rosa-hcp-dual-region/terraform/clusters/cluster_region_1.tfloading... -
Do the same review with
cluster_region_2.tfand adjust it to your needs. This file describes the cluster of the region 2:8.7/aws/openshift/rosa-hcp-dual-region/terraform/clusters/cluster_region_2.tfloading... -
After setting up the terraform files and ensuring your AWS authentication is configured, initialize your Terraform project, then, initialize Terraform to configure the backend and download necessary provider plugins:
export S3_TF_BUCKET_KEY_CLUSTERS="camunda-terraform/clusters.tfstate"
echo "Storing clusters terraform state in s3://$S3_TF_BUCKET_NAME/$S3_TF_BUCKET_KEY_CLUSTERS"
terraform init -backend-config="bucket=$S3_TF_BUCKET_NAME" -backend-config="key=$S3_TF_BUCKET_KEY_CLUSTERS" -backend-config="region=$S3_TF_BUCKET_REGION"
For each cluster's file:
-
Customize the cluster name, availability zones, with the values of your choice.
-
Additionally, provide a secure username and password for the cluster administrator. We strongly recommend managing sensitive information using a secure secrets management solution like HashiCorp Vault. For details on how to inject secrets directly into Terraform via Vault, see the Terraform Vault Secrets Injection Guide.
-
By default, a cluster is accessible from the internet. If you prefer to restrict access, please refer to the official documentation of the module.
-
Configure each cluster by editing the beginning of their respective files in the
localssection:- Each cluster should have a unique, non-overlapping CIDR block to ensure proper functioning of the Submariner overlay network (as referenced in the Submariner documentation). This is essential for successful inter-cluster communication using the Submariner underlay network. If you can't fullfill this requirement, you may need to implement a Submariner Global Private Network.
-
Configure user access to the clusters. By default, the user who creates an OpenShift cluster has administrative access. If you want to grant access to other users, follow the Red Hat documentation for granting admin rights to users when the cluster will be created.
-
Customize the clusters setup. The module offers various input options that allow you to further customize the cluster configuration. For a comprehensive list of available options and detailed usage instructions, refer to the ROSA module documentation.
This ROSA module is based on the official Red Hat Terraform module for ROSA HCP. Please be aware of potential differences and choices in implementation between this module and the official one.
Consult the Camunda ROSA module documentation for more information.
Define outputs
Terraform allows you to define outputs, which make it easier to retrieve important values generated during execution, such as cluster endpoints and other necessary configurations for Helm setup.
Each module that you have previously set up contains an output definition at the end of the file. You can adjust them to your needs.
Execution
-
Plan the configuration files:
# describes what will be created
terraform plan -out clusters.plan \
-var cluster_1_region="$CLUSTER_1_REGION" \
-var cluster_2_region="$CLUSTER_2_REGION" -
After reviewing the plan, you can confirm and apply the changes.
# creates the resources
terraform apply clusters.planTerraform will now create the OpenShift clusters with all the necessary configurations. The completion of this process may require approximately 20-30 minutes.
Region peering module setup
This section outlines the process of setting up communication between two different AWS regions hosting each cluster. To achieve this, we will make use of the Amazon Virtual Private Cloud Peering connection.
The VPC peering connection enables two VPCs in different regions to connect and exchange traffic as if they were part of the same network, while maintaining security through the application of appropriate security groups.
Please note that, once the VPC peering is created, it becomes a dependency of the cluster, therefore it must be destroyed before removing the cluster's VPCs.
Retrieve the peering cluster variables
To create the peering between each cluster’s VPC, you need to gather some information using the terraform outputs of the OpenShift clusters module setup. Follow these steps:
-
First, go in the clusters module directory
ls
# Example output:
# clusters  peering backup_bucket

cd clusters -
Then for each cluster, save the associated VPC ID:
export CLUSTER_1_VPC_ID="$(terraform output -raw cluster_1_vpc_id)"
echo "CLUSTER_1_VPC_ID=$CLUSTER_1_VPC_ID"

export CLUSTER_2_VPC_ID="$(terraform output -raw cluster_2_vpc_id)"
echo "CLUSTER_2_VPC_ID=$CLUSTER_2_VPC_ID"
Set up the peering module
In the parent directory where your clusters module reside (clusters), navigate to the directory called peering which contains the VPC peering configuration:
We'll re-use the previously configured S3 bucket to store the state of the peering configuration.
Begin by reviewing up the config.tf that configures S3 backend for managing the Terraform state:
loading...
Alongside the config.tf file, review the file called peering.tf used to reference the peering configuration:
loading...
One cluster will be referenced as the owner, and the other as the accepter. This designation is used solely for networking purposes and does not imply any dependency between the two clusters.
Initialize Terraform
Once the .tf files are set up, configure the backend for Terraform and set the S3 bucket key for the peering state and initialize Terraform to configure the backend and download the necessary provider plugins:
# ensure bucket variables are set
export S3_TF_BUCKET_REGION="<your-region>"
export S3_TF_BUCKET_NAME="my-rosa-dual-tf-state"

export S3_TF_BUCKET_KEY_PEERING="camunda-terraform/peering.tfstate"

echo "Storing terraform state in s3://$S3_TF_BUCKET_NAME/$S3_TF_BUCKET_KEY_PEERING"

terraform init -backend-config="bucket=$S3_TF_BUCKET_NAME" -backend-config="key=$S3_TF_BUCKET_KEY_PEERING" -backend-config="region=$S3_TF_BUCKET_REGION"
This command connects Terraform to the S3 bucket for managing the state file, ensuring remote and persistent storage.
Execution
-
Navigate to the
peeringdirectory where theconfig.tffile and other.tffiles are located. Ensure that you have performed the previously retrieval of the VPC values. -
Run the following command to generate a plan for the VPC peering configuration. It will connect with peering the previously retrieved VPCs of each cluster:
terraform plan -out peering.plan \
     -var cluster_1_region="$CLUSTER_1_REGION" \
     -var cluster_1_vpc_id="$CLUSTER_1_VPC_ID" \
     -var cluster_2_region="$CLUSTER_2_REGION" \
-var cluster_2_vpc_id="$CLUSTER_2_VPC_ID" -
After reviewing the execution plan, apply the configuration to create the VPC peering connection:
terraform apply peering.planThis command will initiate the creation of the peering connection, enabling communication between the two clusters.
For more details, consult the official AWS VPC Peering documentation.
S3 backup bucket module setup
This section outlines the process of creating a S3 bucket that will be used to to perform backups of the elasticsearch cluster used by Camunda 8. Read more about the failover procecure.
The S3 bucket is set up following best practices, including encryption, logging, and versioning. These configurations can be customized to suit your specific requirements.
Set up the bucket module
In the parent directory where your other modules reside (clusters and peering), navigate to the directory called backup_bucket for the S3 configuration:
ls
# Example output:
# clusters  peering backup_bucket

cd backup_bucket
We'll re-use the previously configured S3 bucket to store the state of the backup bucket configuration.
Begin by reviewing the config.tf file to use the S3 backend for managing the Terraform state:
loading...
Finally, review the file called backup_bucket.tf, that describes the elastic backup bucket configuration:
loading...
This bucket configuration follows multiple best practices.
We encourage you to review the implementation and adjust it according to your specific requirements.
Initialize Terraform
Once the .tf files are set up, configure the backend for Terraform and set the S3 bucket key for the peering state and initialize Terraform to configure the backend and download the necessary provider plugins:
# ensure bucket variables are set
export S3_TF_BUCKET_REGION="<your-region>"
export S3_TF_BUCKET_NAME="my-rosa-dual-tf-state"

# set the region of the bucket
export BACKUP_BUCKET_REGION="us-east-1"

export S3_TF_BUCKET_KEY_BUCKET="camunda-terraform/backup-bucket.tfstate"

echo "Storing terraform state in s3://$S3_TF_BUCKET_NAME/$S3_TF_BUCKET_KEY_BUCKET"

terraform init -backend-config="bucket=$S3_TF_BUCKET_NAME" -backend-config="key=$S3_TF_BUCKET_KEY_BUCKET" -backend-config="region=$S3_TF_BUCKET_REGION"
This command connects Terraform to the S3 bucket for managing the state file, ensuring remote and persistent storage.
The BACKUP_BUCKET_REGION will define the region of the bucket, you can pick one of your cluster region.
Execution
-
Navigate to the
backup_bucketdirectory where theconfig.tffile and other.tffiles are located. -
Run the following command to generate a plan for the S3 bucket configuration. You can edit the default bucket name using
-var=bucket_name=nameOfBucketterraform plan -out backup-bucket.plan \
-var backup_bucket_region="$BACKUP_BUCKET_REGION" -
After reviewing the execution plan, apply the configuration to create the VPC peering connection:
terraform apply backup-bucket.plan # apply the creationThis command will initiate the creation of the backup bucket.
-
You will need to store the following secret variables to set up the dual-region installation of Camunda:
export AWS_ACCESS_KEY_ES=$(terraform output -raw s3_aws_access_key)
export AWS_SECRET_ACCESS_KEY_ES=$(terraform output -raw s3_aws_secret_access_key)
export AWS_ES_BUCKET_NAME=$(terraform output -raw s3_bucket_name)
export AWS_ES_BUCKET_REGION="$BACKUP_BUCKET_REGION"

echo "AWS_ACCESS_KEY_ES=$AWS_ACCESS_KEY_ES"
echo "AWS_SECRET_ACCESS_KEY_ES=$AWS_SECRET_ACCESS_KEY_ES"
echo "AWS_ES_BUCKET_NAME=$AWS_ES_BUCKET_NAME"
echo "AWS_ES_BUCKET_REGION=$AWS_ES_BUCKET_REGION"
Ensure these variables are securely stored, as they will be needed later in the process.
Reference files
You can find the reference files used on this page
2. Preparation for Camunda 8 installation
Access the created OpenShift clusters
You can now access the created OpenShift clusters.
-
Verify that you are in the OpenShift clusters module directory
clusters:pwd
# Example output:
# ./camunda-deployment-references/aws/openshift/rosa-hcp-dual-region/terraform/clusters/ -
Set up the required environment variables from the OpenShift terraform module:
8.7/aws/openshift/rosa-hcp-dual-region/procedure/gather-cluster-login-id.shloading... -
Give cluster administrator role to the created user for each cluster:
# Cluster 1
rosa grant user cluster-admin --cluster="$CLUSTER_1_NAME" --user="$CLUSTER_1_ADMIN_USERNAME"

# Cluster 2
rosa grant user cluster-admin --cluster="$CLUSTER_2_NAME" --user="$CLUSTER_2_ADMIN_USERNAME" -
Log in to the OpenShift clusters and configure the kubeconfig contexts:
# Cluster 1
oc config delete-context "$CLUSTER_1_NAME" || true

oc login -u "$CLUSTER_1_ADMIN_USERNAME" "$CLUSTER_1_API_URL" -p "$CLUSTER_1_ADMIN_PASSWORD"
oc config rename-context $(oc config current-context) "$CLUSTER_1_NAME"

# Cluster 2
oc config delete-context "$CLUSTER_2_NAME" || true

oc login -u "$CLUSTER_2_ADMIN_USERNAME" "$CLUSTER_2_API_URL" -p "$CLUSTER_2_ADMIN_PASSWORD"
oc config rename-context $(oc config current-context) "$CLUSTER_2_NAME" -
Verify your connection to the clusters with
oc:8.7/aws/openshift/rosa-hcp-dual-region/procedure/verify-cluster-nodes.shloading...
In the remainder of the guide, different namespaces will be created following the needs of the dual-region architecture.
3. Next installation steps
The next steps are generic and referenced in the Generic OpenShift Dual-Region for Camunda 8 guide.
It includes:
- Installation of Advanced Cluster Management
- Installation of Submariner
- Preparation of the configuration for Camunda 8 on dual-region
- Installation of Camunda 8 in OpenShift dual-region.
4. Deletion of Terraform Resources
Deletion of the VPC peering
The VPC peering module can be deleted once it is no longer in use and has no dependencies. Once the VPC peering is deleted, the clusters will not be able to communicate with each other anymore.
To delete the module, follow these steps:
-
Before proceeding with the deletion of the VPC peering module, ensure that the necessary variables, which were provided during the module creation, are still available. To verify that the required variables are correctly defined, repeat the steps from the retrieve the VPC peering cluster variables section.
-
Ensure that the
CLUSTER_1_REGIONandCLUSTER_2_REGIONvariables are defined correctly:# set the region, adjust to your needs
export CLUSTER_1_REGION="us-east-1"
export CLUSTER_2_REGION="us-east-2" -
Navigate to the VPC peering module directory
peeringwhere the VPC peering module configuration is located. -
Execute the following command to plan the destruction of the VPC peering module. Ensure the correct variables are passed in, as shown below:
terraform plan -destroy \
  -var cluster_1_region="$CLUSTER_1_REGION" \
  -var cluster_1_vpc_id="$CLUSTER_1_VPC_ID" \
  -var cluster_2_region="$CLUSTER_2_REGION" \
  -var cluster_2_vpc_id="$CLUSTER_2_VPC_ID" \
  -out destroy-peering.plan
This command will generate a plan to destroy the resources and save it in a file called
destroy-peering.plan. -
After reviewing the destruction plan, apply the changes to delete the VPC peering module resources by running:
terraform apply destroy-peering.planOnce the
applycommand completes successfully, the VPC peering module and associated resources will be deleted.
Deletion of the clusters
The clusters can be deleted once they are no longer in use and have no dependencies. Since clusters rely on the VPC Peering connection, the Peering module must be deleted first.
-
Before proceeding with cluster deletion, ensure that the VPC Peering has been successfully removed by following the steps in the deletion of the VPC Peering section.
-
Go to the directory
clusterswhere the clusters configurations are managed. -
Execute the following command to generate a plan for deleting the clusters, ensuring the correct variables are passed:
terraform plan -destroy \
  -var cluster_1_region="$CLUSTER_1_REGION" \
  -var cluster_2_region="$CLUSTER_2_REGION" \
  -out destroy-clusters.plan
This command will generate a plan to destroy the clusters and save it in a file called
destroy-clusters.plan. -
After reviewing the destruction plan, apply the changes to delete the cluster resources by running:
terraform apply destroy-clusters.planOnce the
applycommand completes successfully, the clusters and associated resources will be deleted.
Deletion of the S3 backup bucket
The S3 backup bucket can be deleted once it is no longer in use and has no dependencies. To delete the bucket, follow these steps:
-
Navigate to the
backup_bucketdirectory created during the S3 backup bucket module setup. This directory contains the configuration for managing the S3 bucket. -
Run the Terraform destroy plan:
Execute the following Terraform command to plan the destruction of the S3 bucket and other resources:terraform plan -destroy -out destroy-bucket.planThis command will generate a plan to destroy the resources and output it into a file called
destroy-bucket.plan. -
After reviewing the plan, apply the changes to delete the resources with the following command:
terraform apply destroy-bucket.planOnce the
applycommand is successfully completed, the S3 bucket and associated resources will be deleted.